
20 min read
So I've been eyeing the latest Corsair Ones since last summer. I figured I could drop 3k on it when annual bonuses rolled around and get all the performance I needed for gaming with none of the hassle of building and a nice small form factor to boot. My current gaming PC is getting up there in age at 6.5 years old. It's been starting to show its age with sporadic lagging on Beat Saber and I figured it was time to spend my bonus on something nice for myself for a change.
However, James (one of my friends) introduced me to mini-ITX builds and the small form factor PC (SFFPC) subreddit and got me hyped up about trying it out. We discussed parts and eventually came up with a rough idea for a build that came out to 3k even with an RTX 4090 as opposed to the Corsair One's 3080/3080Ti. I thought to myself, “hey, I've built a PC before with my then-boyfriend-now-husband Jon and that was pretty fun so sure, let's give it a shot”… except for the itty-bitty fact that the case was itty-bitty and the graphics card was a hulking behemoth.
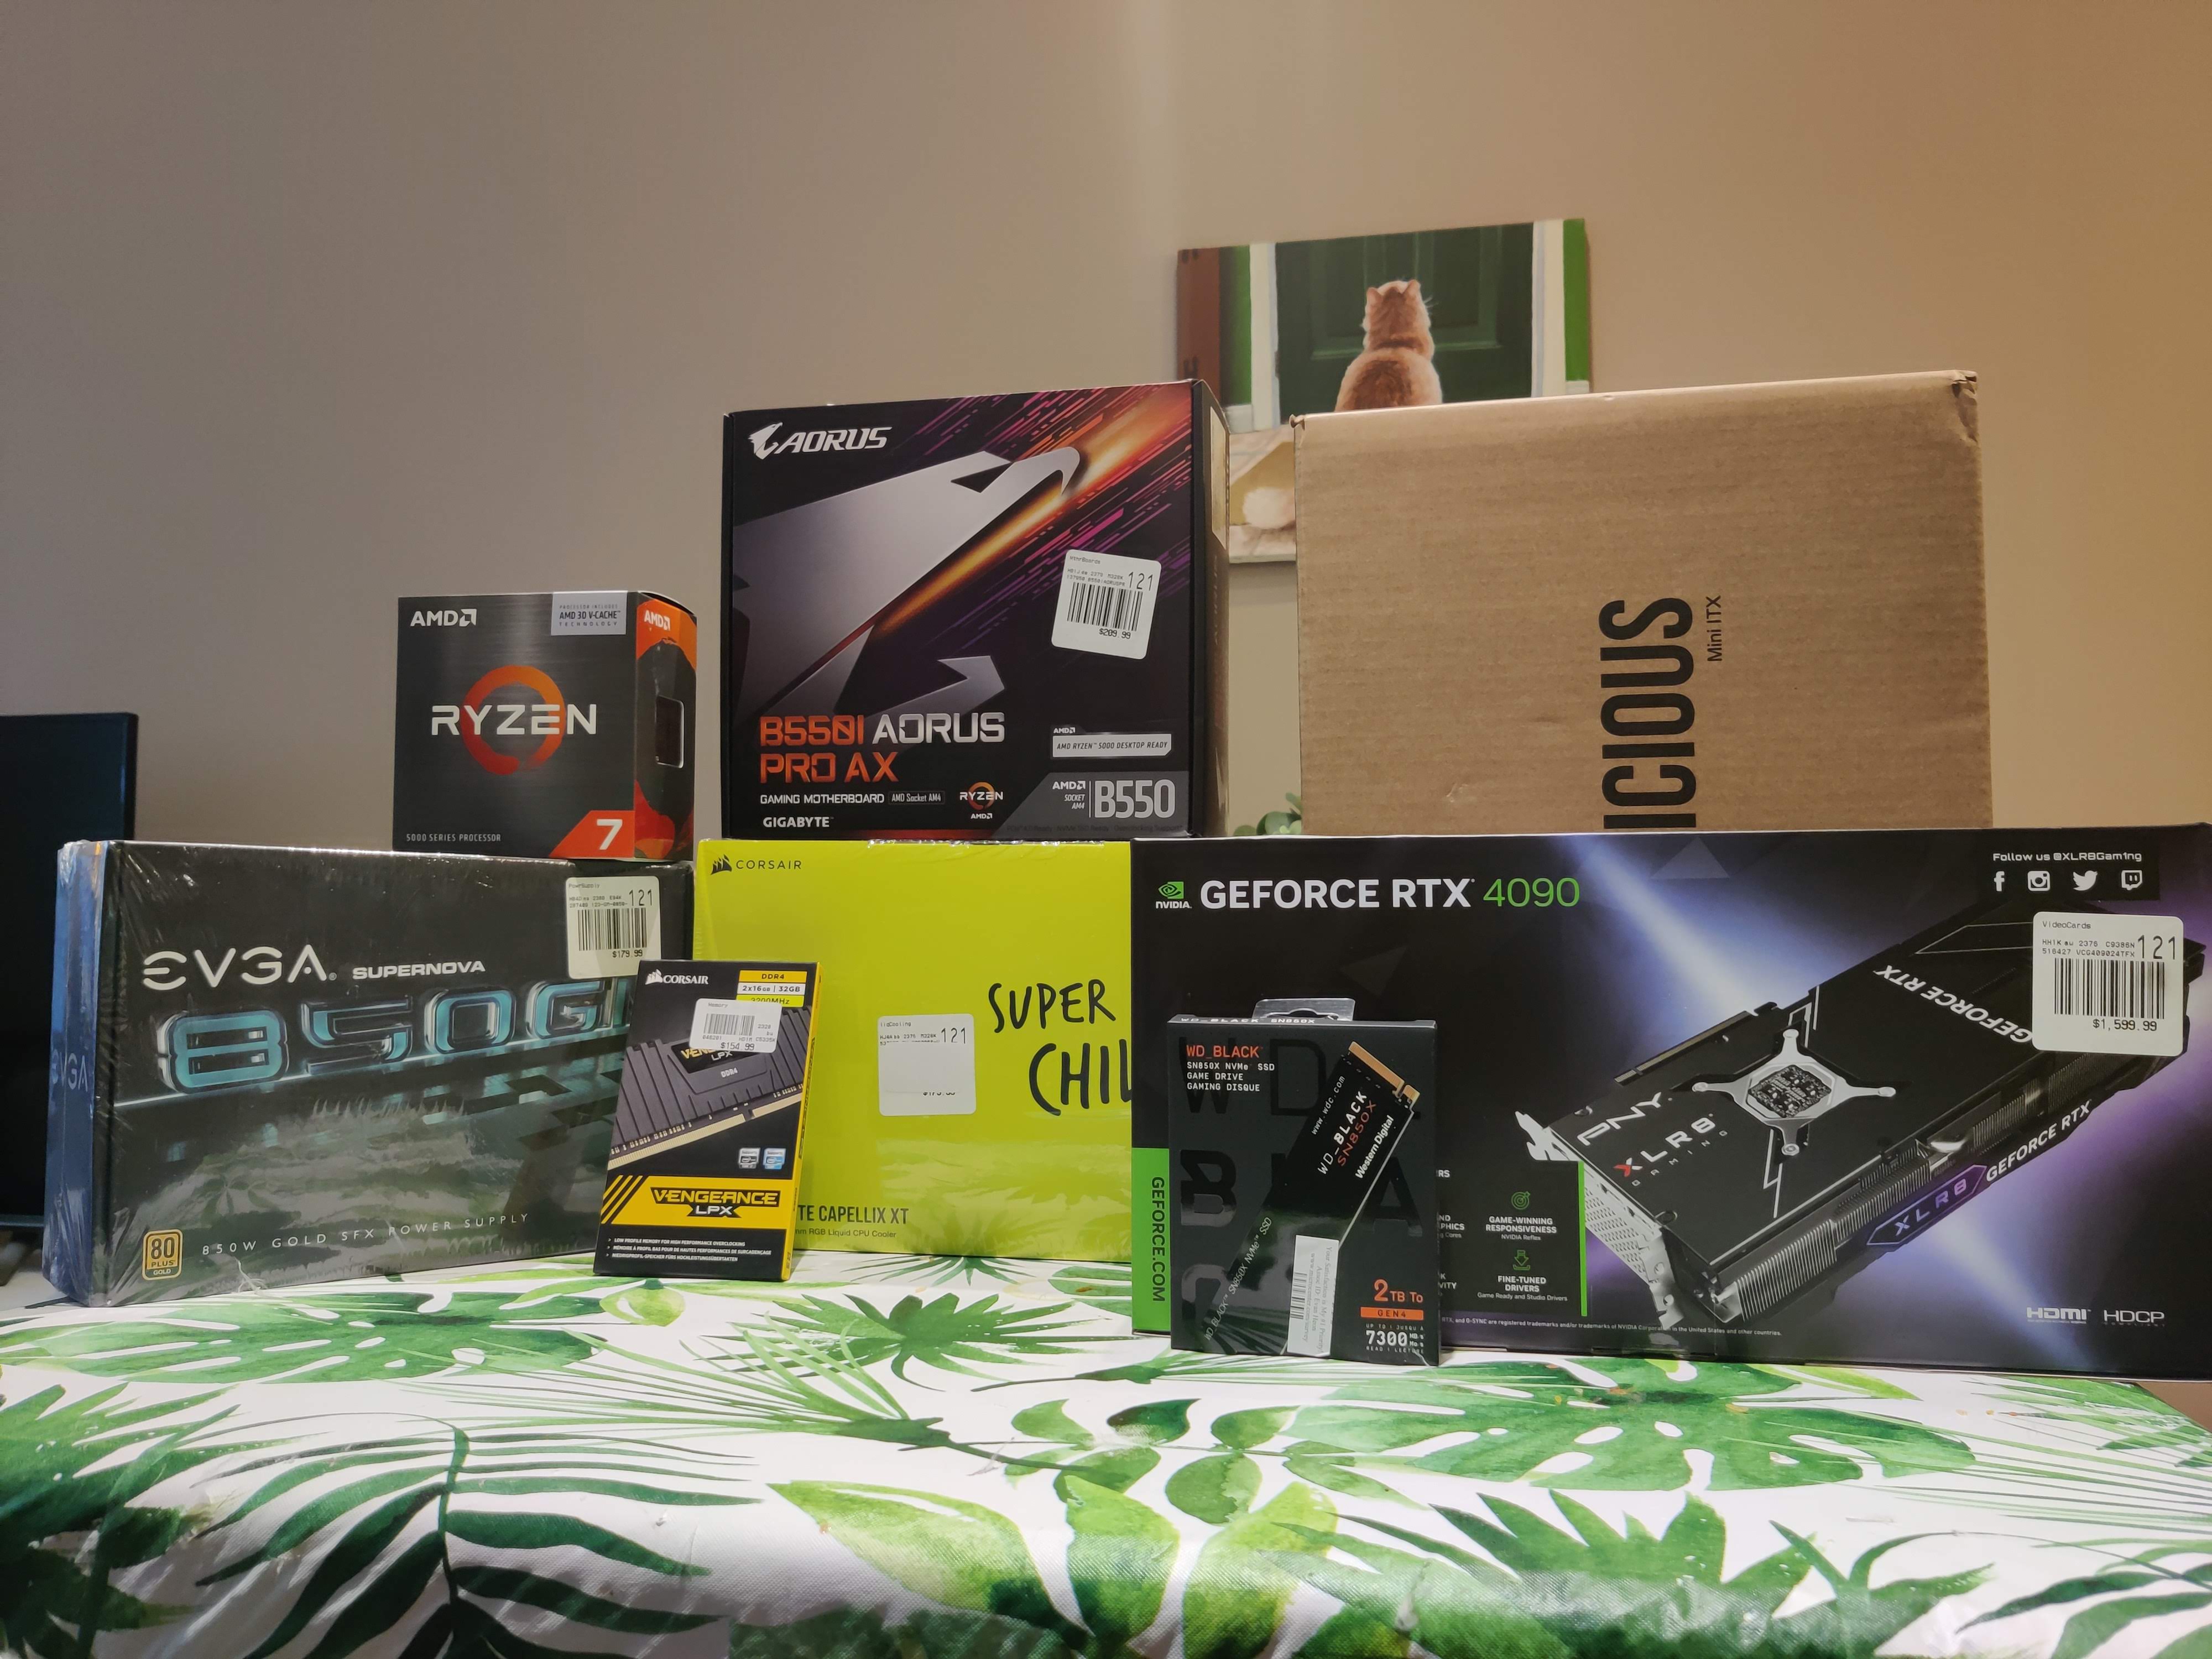
The parts
Reference build: https://pcpartpicker.com/user/Privater/saved/wCY6Q7
My build: https://pcpartpicker.com/user/chowner/saved/g2Cw3C

"A bonus well-spent!"
Why these? I was limited to what I could get at the Cambridge Microcenter which has a whole lot of stuff but not everything under the sun of course.
I was interested in the Meshlicious mini-ITX case from some preliminary research. The Fractal case from the reference build was my dream case for the absolute minimal form factor, but it would have been an even bigger headache trying to fit everything when my cable management skills are subpar.
Since I would be doing a custom build, I wanted an RTX 4090 for future-proofing my VR rig — in particular the Founder's edition like in the reference list since it was the smallest. The 4090 I ended up buying was the only one small enough in-store to fit the case and I mean just BARELY.
The 16 GB in the reference build seemed a bit on the low-end for RAM, so I opted for 32 GB. That being said, I don't need a whole lot since I don't actually use my browser on my PC unless something goes horribly wrong with my Beat Saber mods and I don't do any instant replays for video recording.
I was convinced to go for 2 TB of NVMe storage instead of the 1 TB I saw in store since it was only $50 more. I could have went for PCI-e 5.0, but I didn't care enough to spend extra.
For the CPU and motherboard, I was able to get the same exact ones as in the reference list.
For the PSU I ended up with the 850W version of the EVGA PSU instead of the 750W since IIRC it was the best match the microcenter had. It was the same size anyway, so why not.
Finally the cooler was a bit of a head-scratcher. It was tough deciding between air and liquid cooling since air cooling would be easier to install but would mean my CPU would run hotter. Since I wanted to extend the lifetime of my build, I opted for liquid cooling though I was warned it would be a hassle to install… more on that later!
Day 1: The fun stage
After getting assisted with part buying in-store and picking those all up from the various isles (and after some wandering around with James and my husband), we proceeded to checkout. With all the main parts with the exception of a couple cables I needed off of Amazon, the grand total with tax came out to almost exactly 3k… not bad considering the upgrades I ended up getting! I was able to get the case was half-off since it was open box, bringing the overall price down to what I was expecting to spend anyway. I was pretty happy as I wheeled my haul to the car. After some tasty Japanese food for lunch at Porter Square, we went back to my apartment to start the build.
This is one comically large wifi antenna
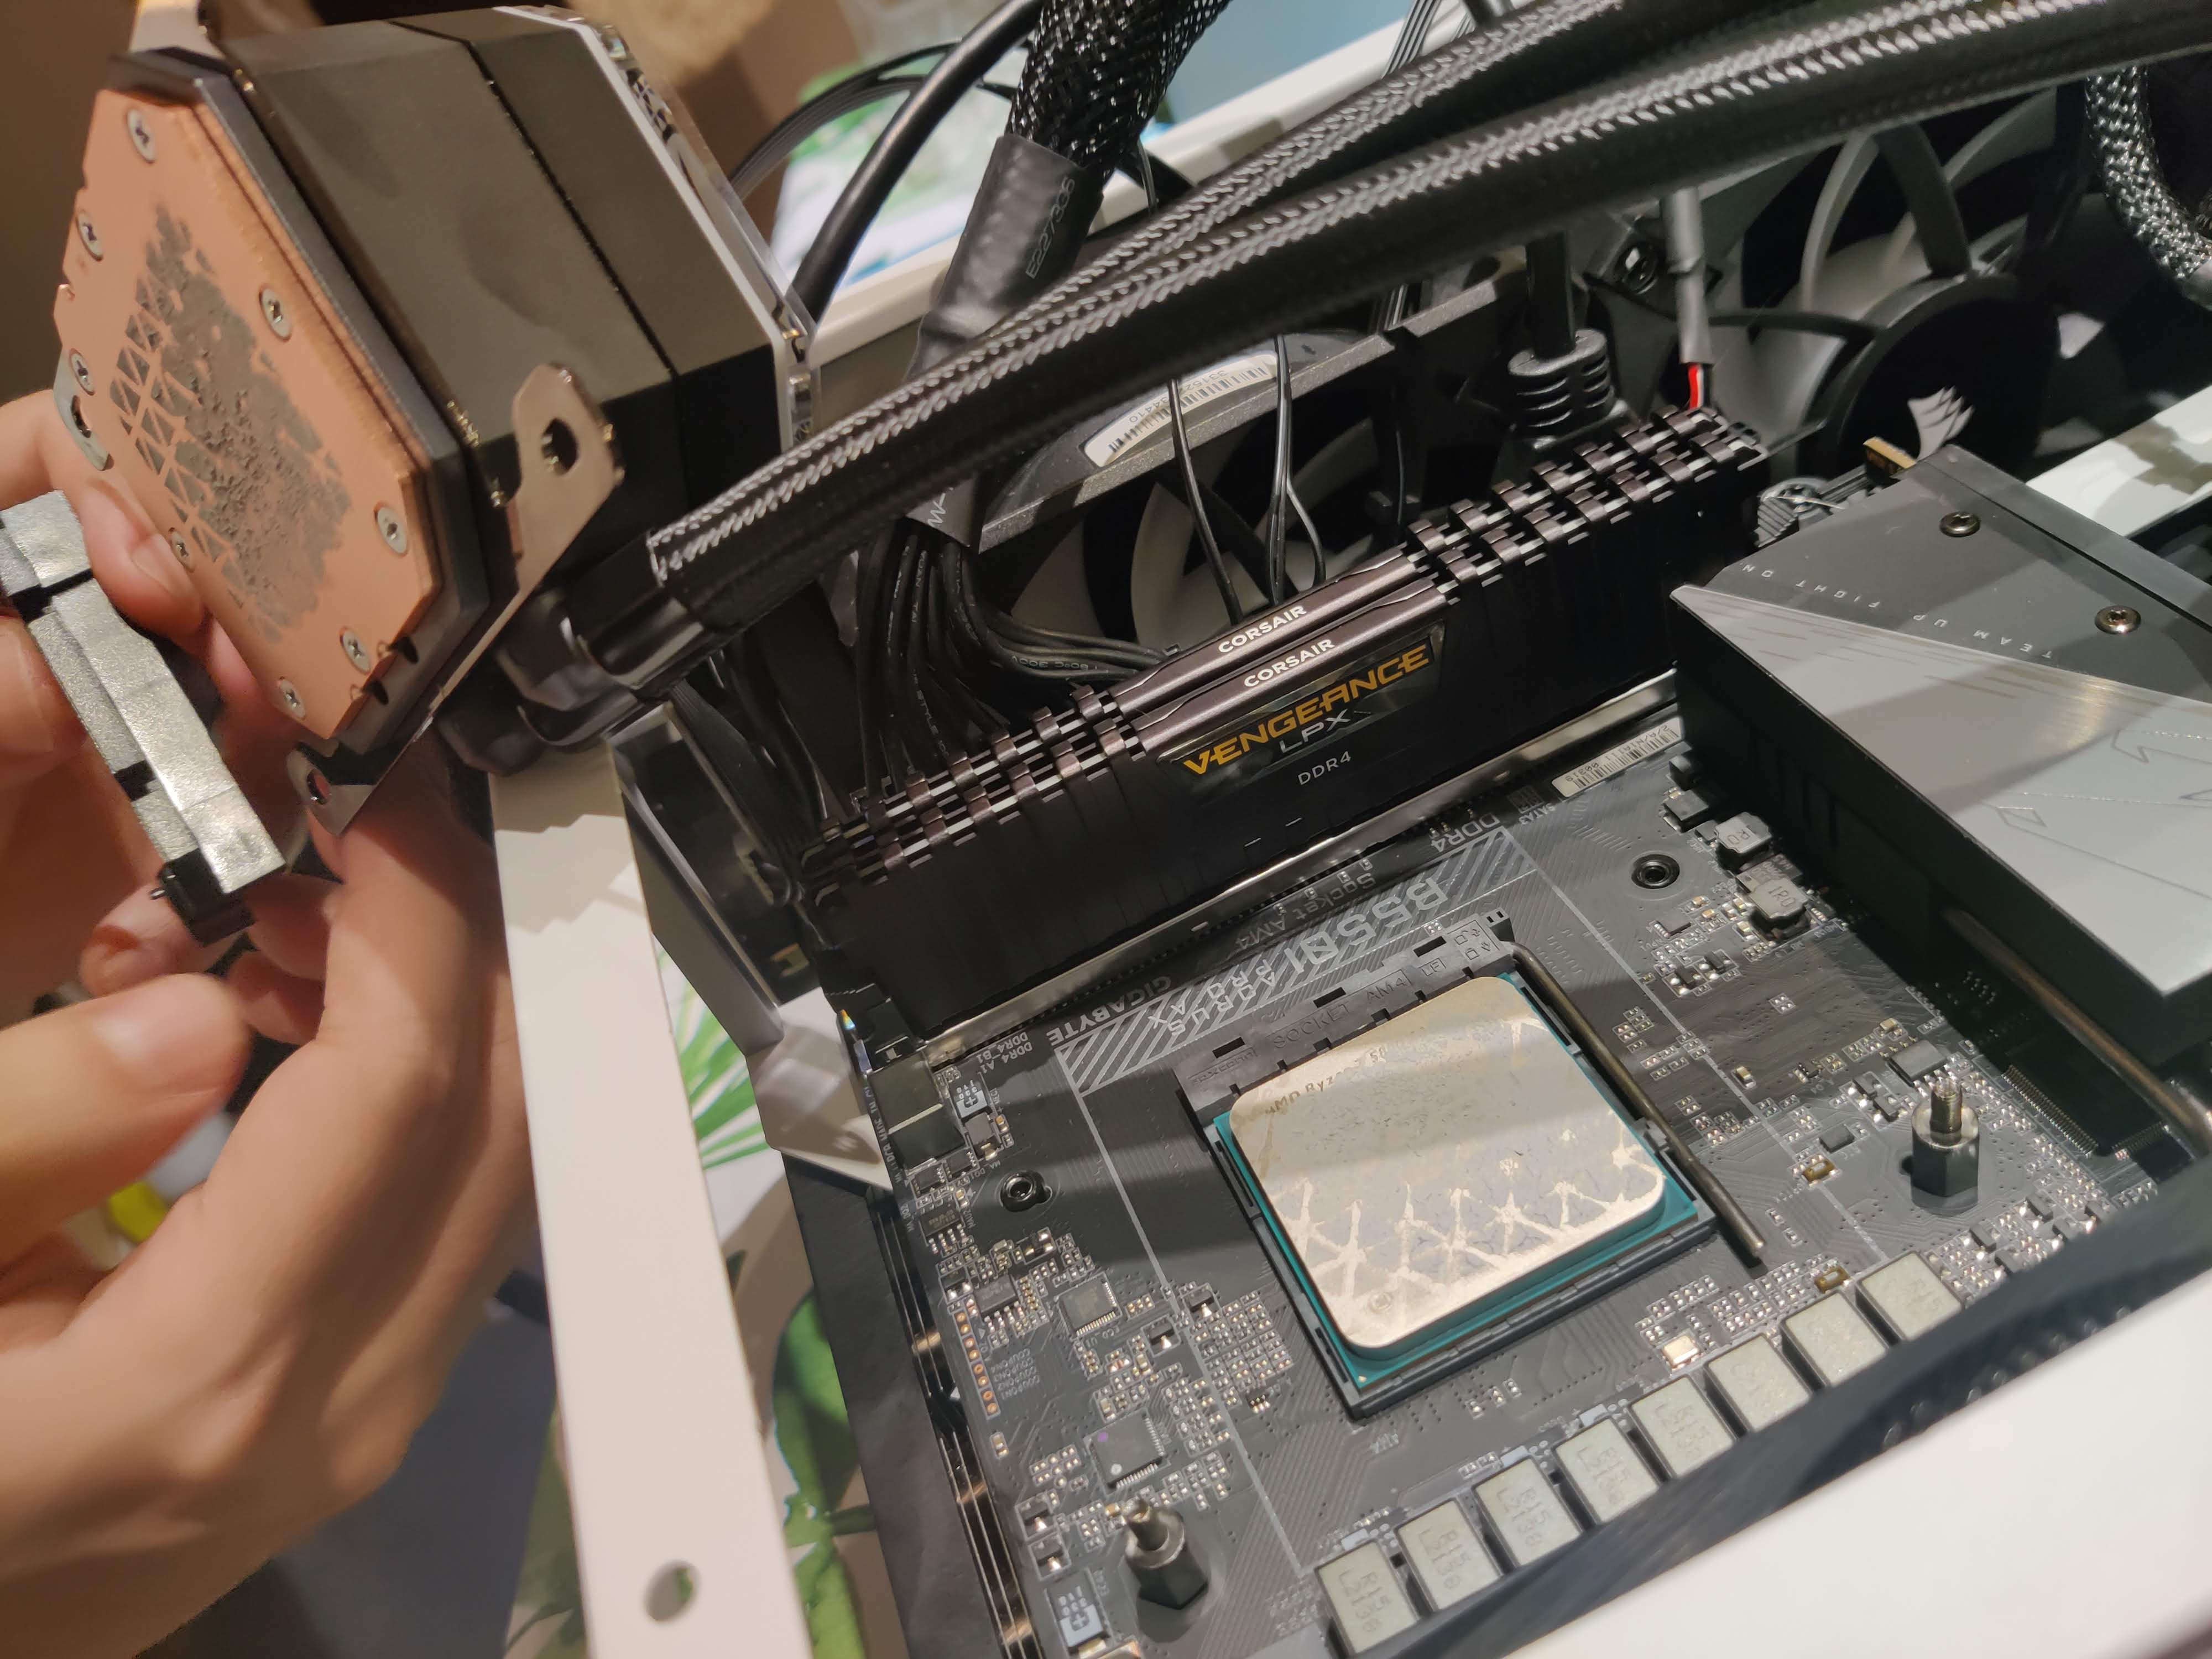
First thing first was configuring the case to be ready for the GPU as we were told to shift the inner panel back a notch so it would fit. This was pretty straightforward, the mesh panels came off without much hassle and making the adjustment was simple. Afterwards, we installed the PSU since that wasn’t going to budge as well as the radiator and its fans (configured to pull in air after we found out either is alright). After clicking the RAM and storage into the motherboard, we installed that next and wired it up with the existing installed components.
By the time we got around to finishing all that (and watching some YouTube videos on the side), it was 9 PM and time to send James home for work in the morning. Besides, we were stuck until we got the PCI-e 5.0 extension cable so we could install and wire up the GPU. Jon and I’d pick back up on that tomorrow night.
Day 2: The not-so-fun stage
The cable came in mid-day so Jon and I continued the build after work while we texted James on the side to report progress. We started off installing the CPU itself onto the motherboard which was pretty easy — you just have to make sure the triangles are aligned, drop it into place, and lock it in with the metal arm. Next was installing the pump on top of the CPU, which should have been easy… if we were looking at the right online manual (part names are confusing) and hadn’t misplaced a critical bag of screws from yesterday.
We were able to easily figure out the right bracket to use for the pump, but we couldn’t find the necessary thumb screws for it which led to some… interesting workarounds. We ended up applying and removing the pump — smudging the pre-applied thermal paste all the while — at least 3 times while we tried to figure out the exact pieces we really needed. By the time we finally got the pump properly installed with the correct thumb screws, I was feeling pretty out of my depth. We hadn’t even gotten to the ACTUAL hard part yet!
"Oh boy what did I get myself into..."
We then tried to figure out what to do with the VGA cables for the graphics card now that we had the extension cable that we were recommended for this particular build. I had notes from the microcenter trip the day before, but I missed a couple things about the wiring, namely, that I would only have 2 slots for VGA cables on the PSU (which was surprisingly fine, it would just run at a lower wattage). Neither my husband nor I are very experienced at building PCs, so it took us some time and Googling to realize that no, CPU2 on the PSU cannot take a VGA cable even though they look really similar. So being limited to 2 VGA cables, we had to run in the configuration not recommended by the extension cable guide… which is probably fine, I was told that we didn’t really need to go for the 1000 Watt PSU (which probably wouldn’t have fit anyway).
"I'm gonna pretend I didn't see that"
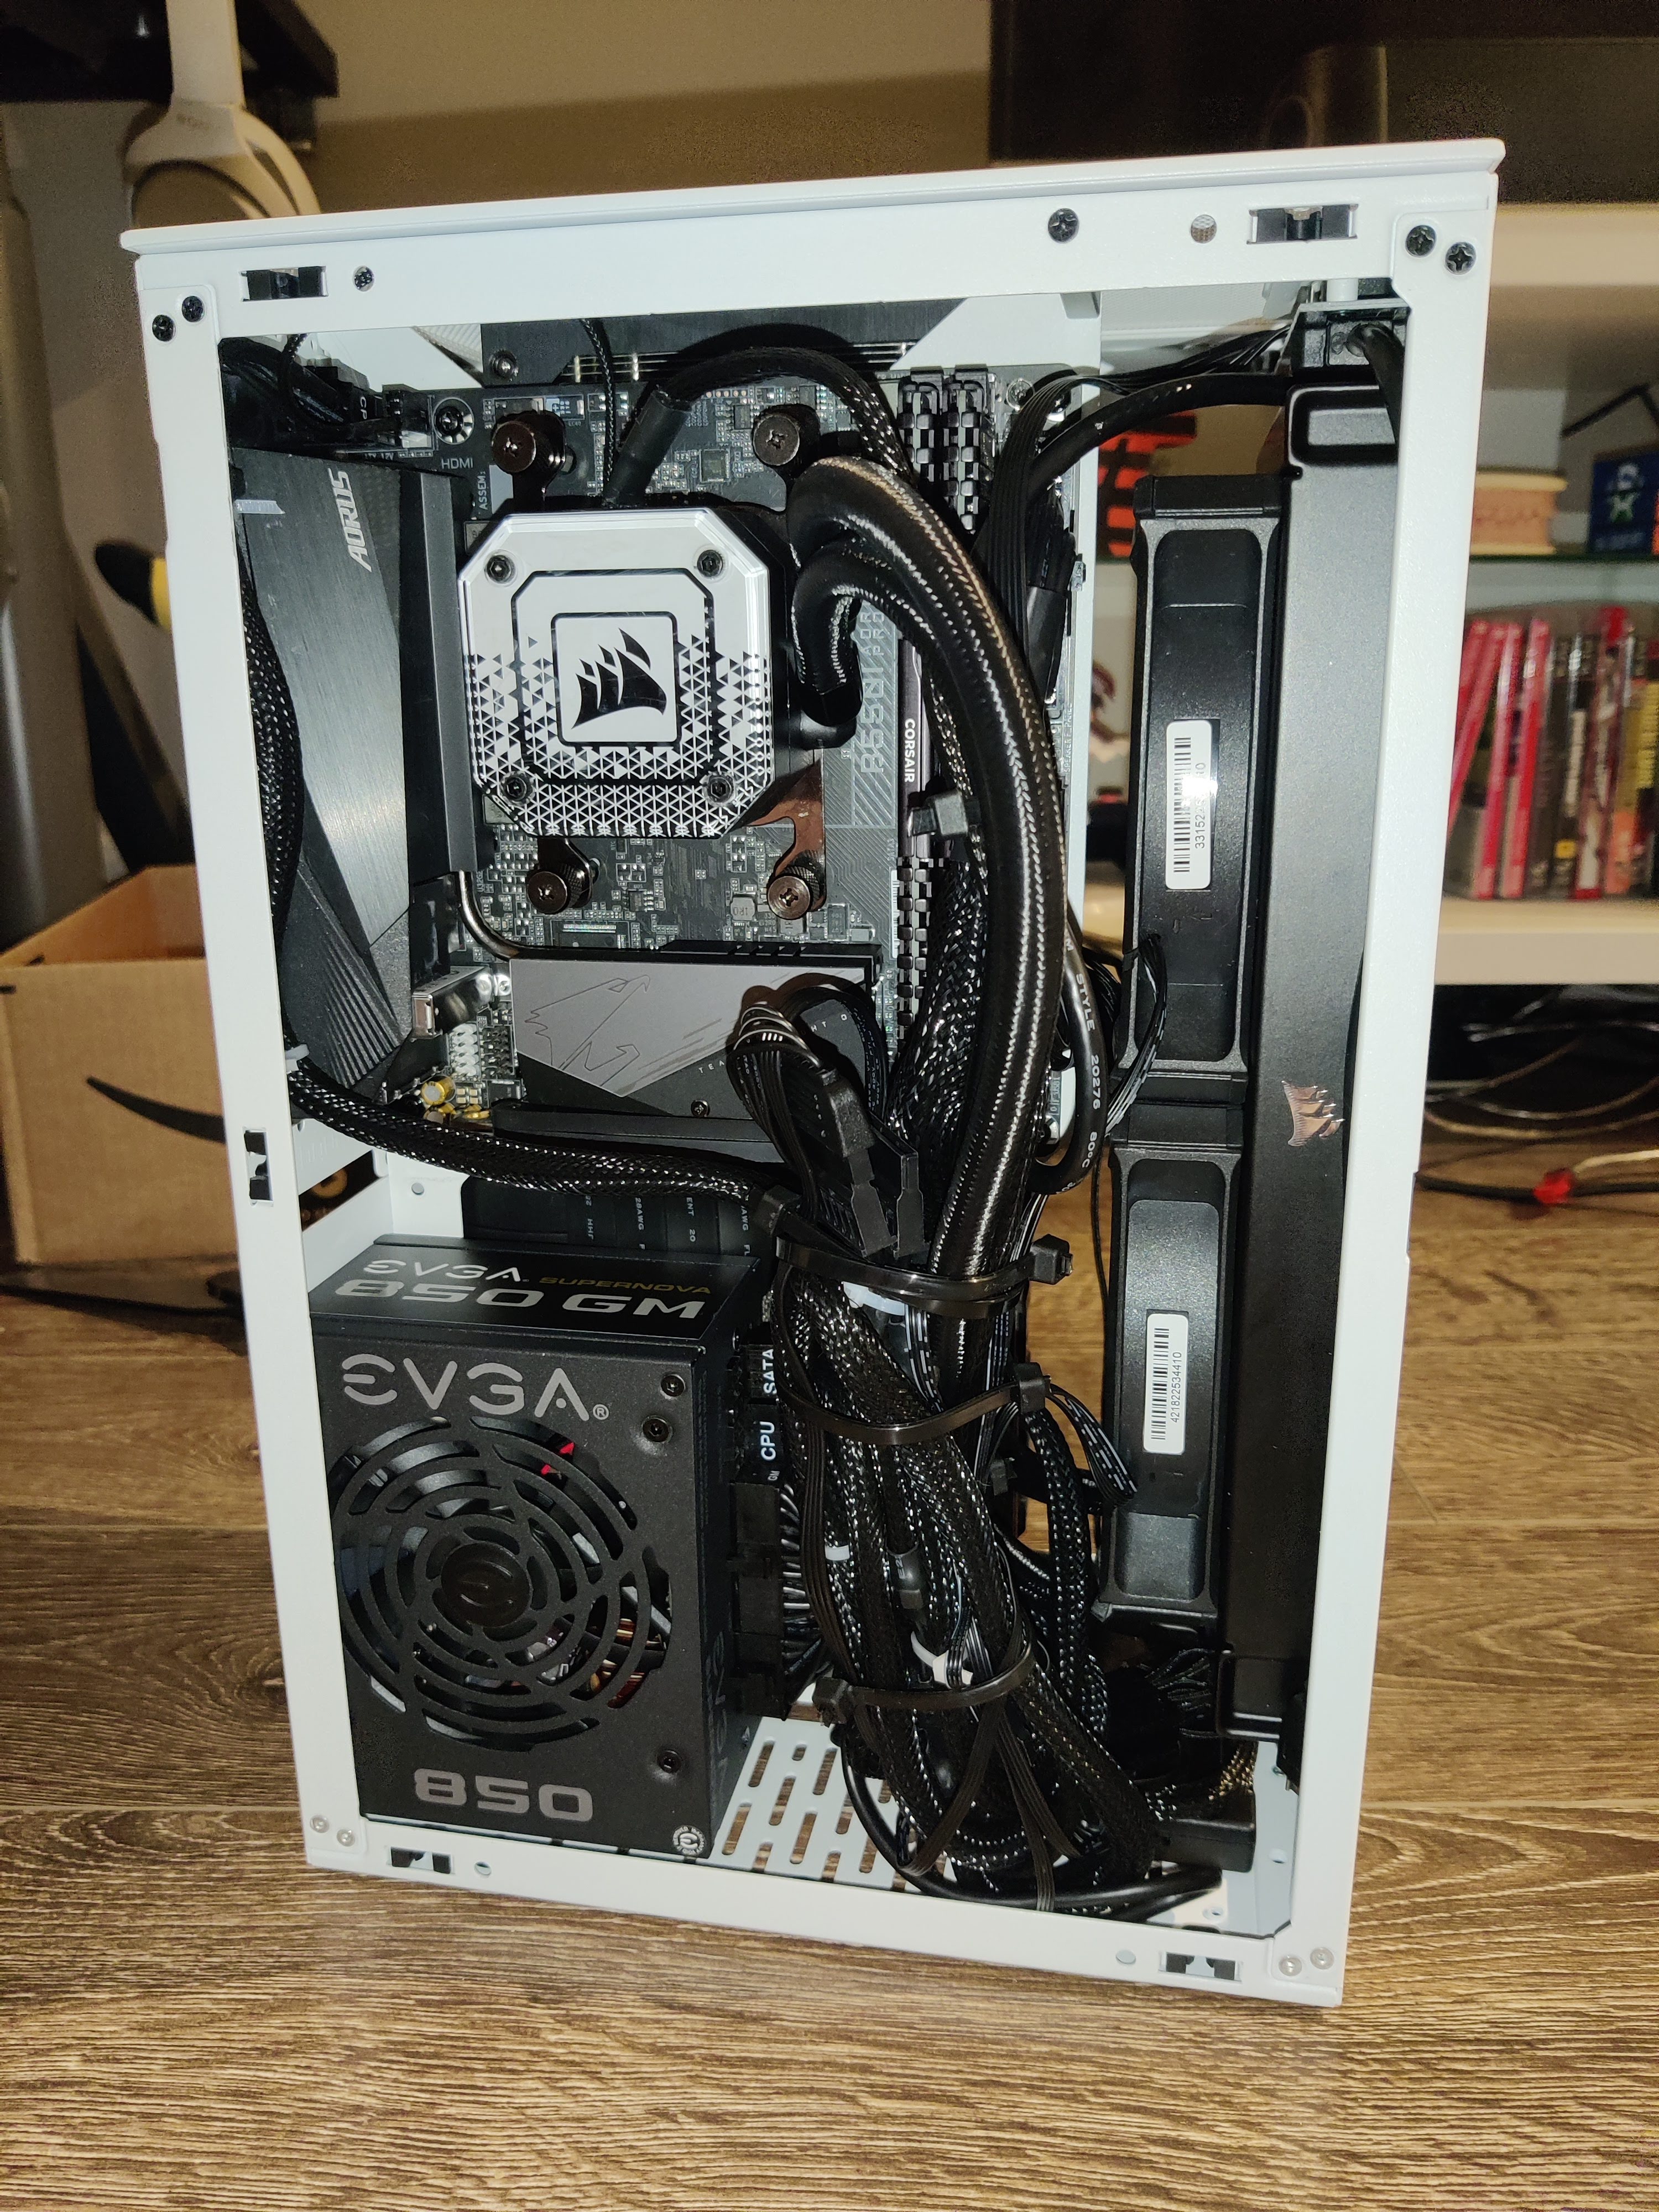
Next was the ACTUAL hard part — getting the monster of a graphics card into the case. We were told we should put the cable into the card before seating it into the case since there’s so little clearance between the fans of the radiator and the card itself once slotted into the PCI riser cable. There was so little clearance, in fact, that I was convinced the connections in the extension cable were going to break because we had to bend it at 20mm away from the connector — the absolute bare minimum. The whole time we were trying to seat the card I was pretty sweaty palms, hoping that nothing was going to break — which we later confirmed thankfully.
YIKES
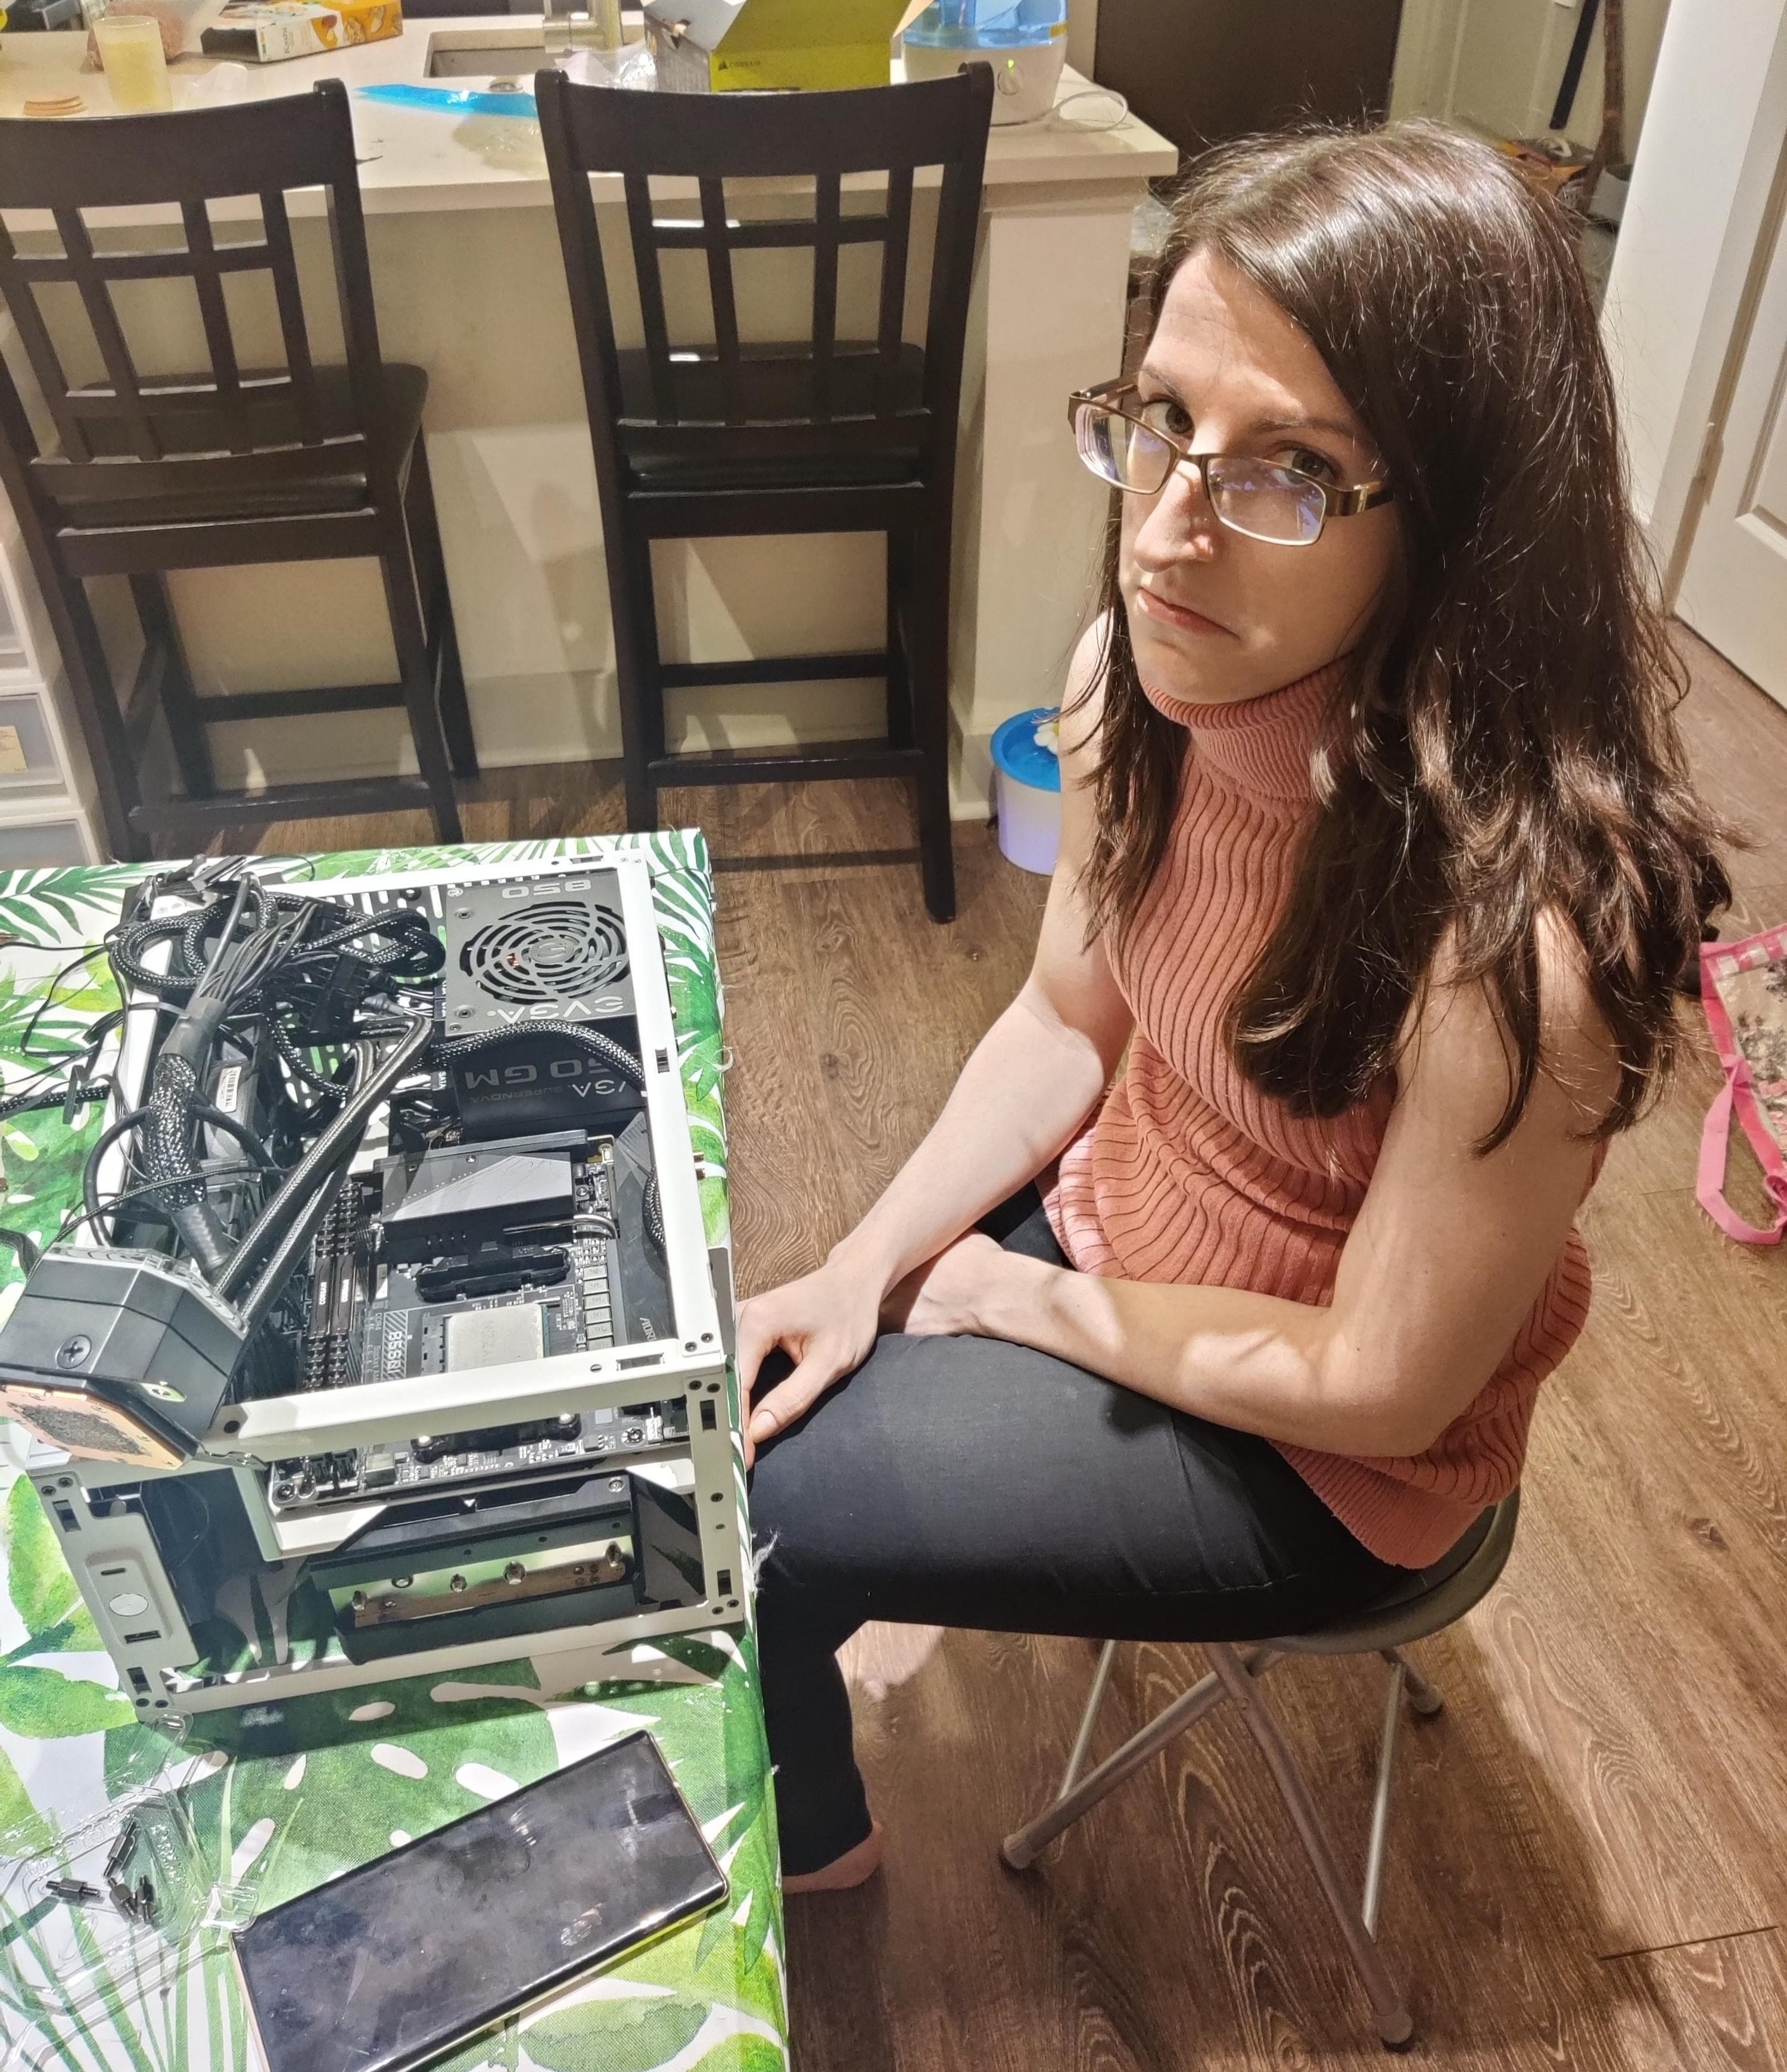
After wiring everything into place came the nerve-wracking power on test — a confirmation that the hardware itself all worked together. I lugged my PC with its guts spilling out of the sides over to my TV and plugged in the power, needing to flip the entire build upside down to access the HDMI slot on the GPU. After flipping the switch on in the back and setting the proper display on the TV, I tipped the PC slightly to hit the power button that was now facing the floor. I pressed the button aaand…. nothing happened. Oh no.... What did I mess up? We flipped the switch back to off and looked inside the case again at the wiring. We realized somehow we forgot to re-plug in the connectors for the motherboard and CPU into the power supply as we had to get in the GPU’s VGA cables into the PSU. Whoops.
Once that was fixed, we ran the power-on test for real. With a click of the power button, the machine came to life and started glowing all sorts of rainbow colors as all the fans of the GPU and cooler spun up. Success! But… there was no reaction on the TV, not even displaying the splash screen for the motherboard. We found out this expected, we’d need to first flash an OS onto a thumb drive and boot off of that before we could get around to poking around in the BIOS.
Messy, but at least turns on!
Figuring this wouldn’t be too time-consuming, I grabbed a thumb drive out of the bag of them that we had in a drawer and confirmed that it was large enough to hold an ISO (the first couple weren’t). I wiped and re-formatted the 8GB thumb drive to FAT32 after confirming nothing of importance was on it and began to download Ubuntu. It was going fine… til it got to around 4.3GB and then failed the download. Weird, I thought. I retried the download and hit the same issue. By this point, it was getting pretty late on a weeknight. I figured this would be a task for tomorrow.
Day 3: OS installation
After work finished up, I got right back to trying to get an OS onto the thumb drive. I figured I would just try Windows 10 (I really didn’t want to “upgrade” to 11) instead of Ubuntu since Ubuntu on this PC was only meant to be a test anyway. I tried to download the Windows 10 ISO onto the same thumb drive. Still no dice. After much Googling around, I found out that FAT32 means the files cannot exceed 4GB. My ISO was a bit over that. Well now what? I could try to break the ISO up into smaller files as I found out, but that seemed complicated. I found out that Microsoft has an ISO tool to get around this… but it only seemed to be offered for Windows 11.
After much deliberation, I bit the bullet and reluctantly downloaded the tool with the intention to install Windows 11 on the new build since it would likely save me the most time. Annoyingly, I needed to use my old PC just to run the tool since it was only available as a .exe file, but it did successfully get the Windows 11 ISO onto the thumb drive while I played some Tiny Tina’s on the side.
Next up: booting the new PC off of the thumb drive. I reached for my trusty wireless keyboard after plugging in the thumb drive and powering on the PC… only to realize the keyboard was no longer working despite the receiver being plugged in. Was it some weird driver issue? I decided to check the batteries as I hadn’t replaced them in some time. I popped off the back aaand… one of the batteries had decided today was the day to leak (literally it was perfectly fine the day before). After cleaning out all the crusty battery acid, I went to replace it with a new AA battery… only to realize none of the AA batteries left in the fridge had enough juice (I wish I still had my voltmeter!). Yet another Amazon order later, I’d have batteries in a few days. So for now I had no keyboard — until I realized we had a spare wired keyboard and mouse in the closet.
After plugging in the replacements, now I was able to actually select a boot device! I was brought to the Windows installation screen after selecting the thumb drive and was about to proceed when I got a weird error… “This PC can’t run Windows 11”. What?!
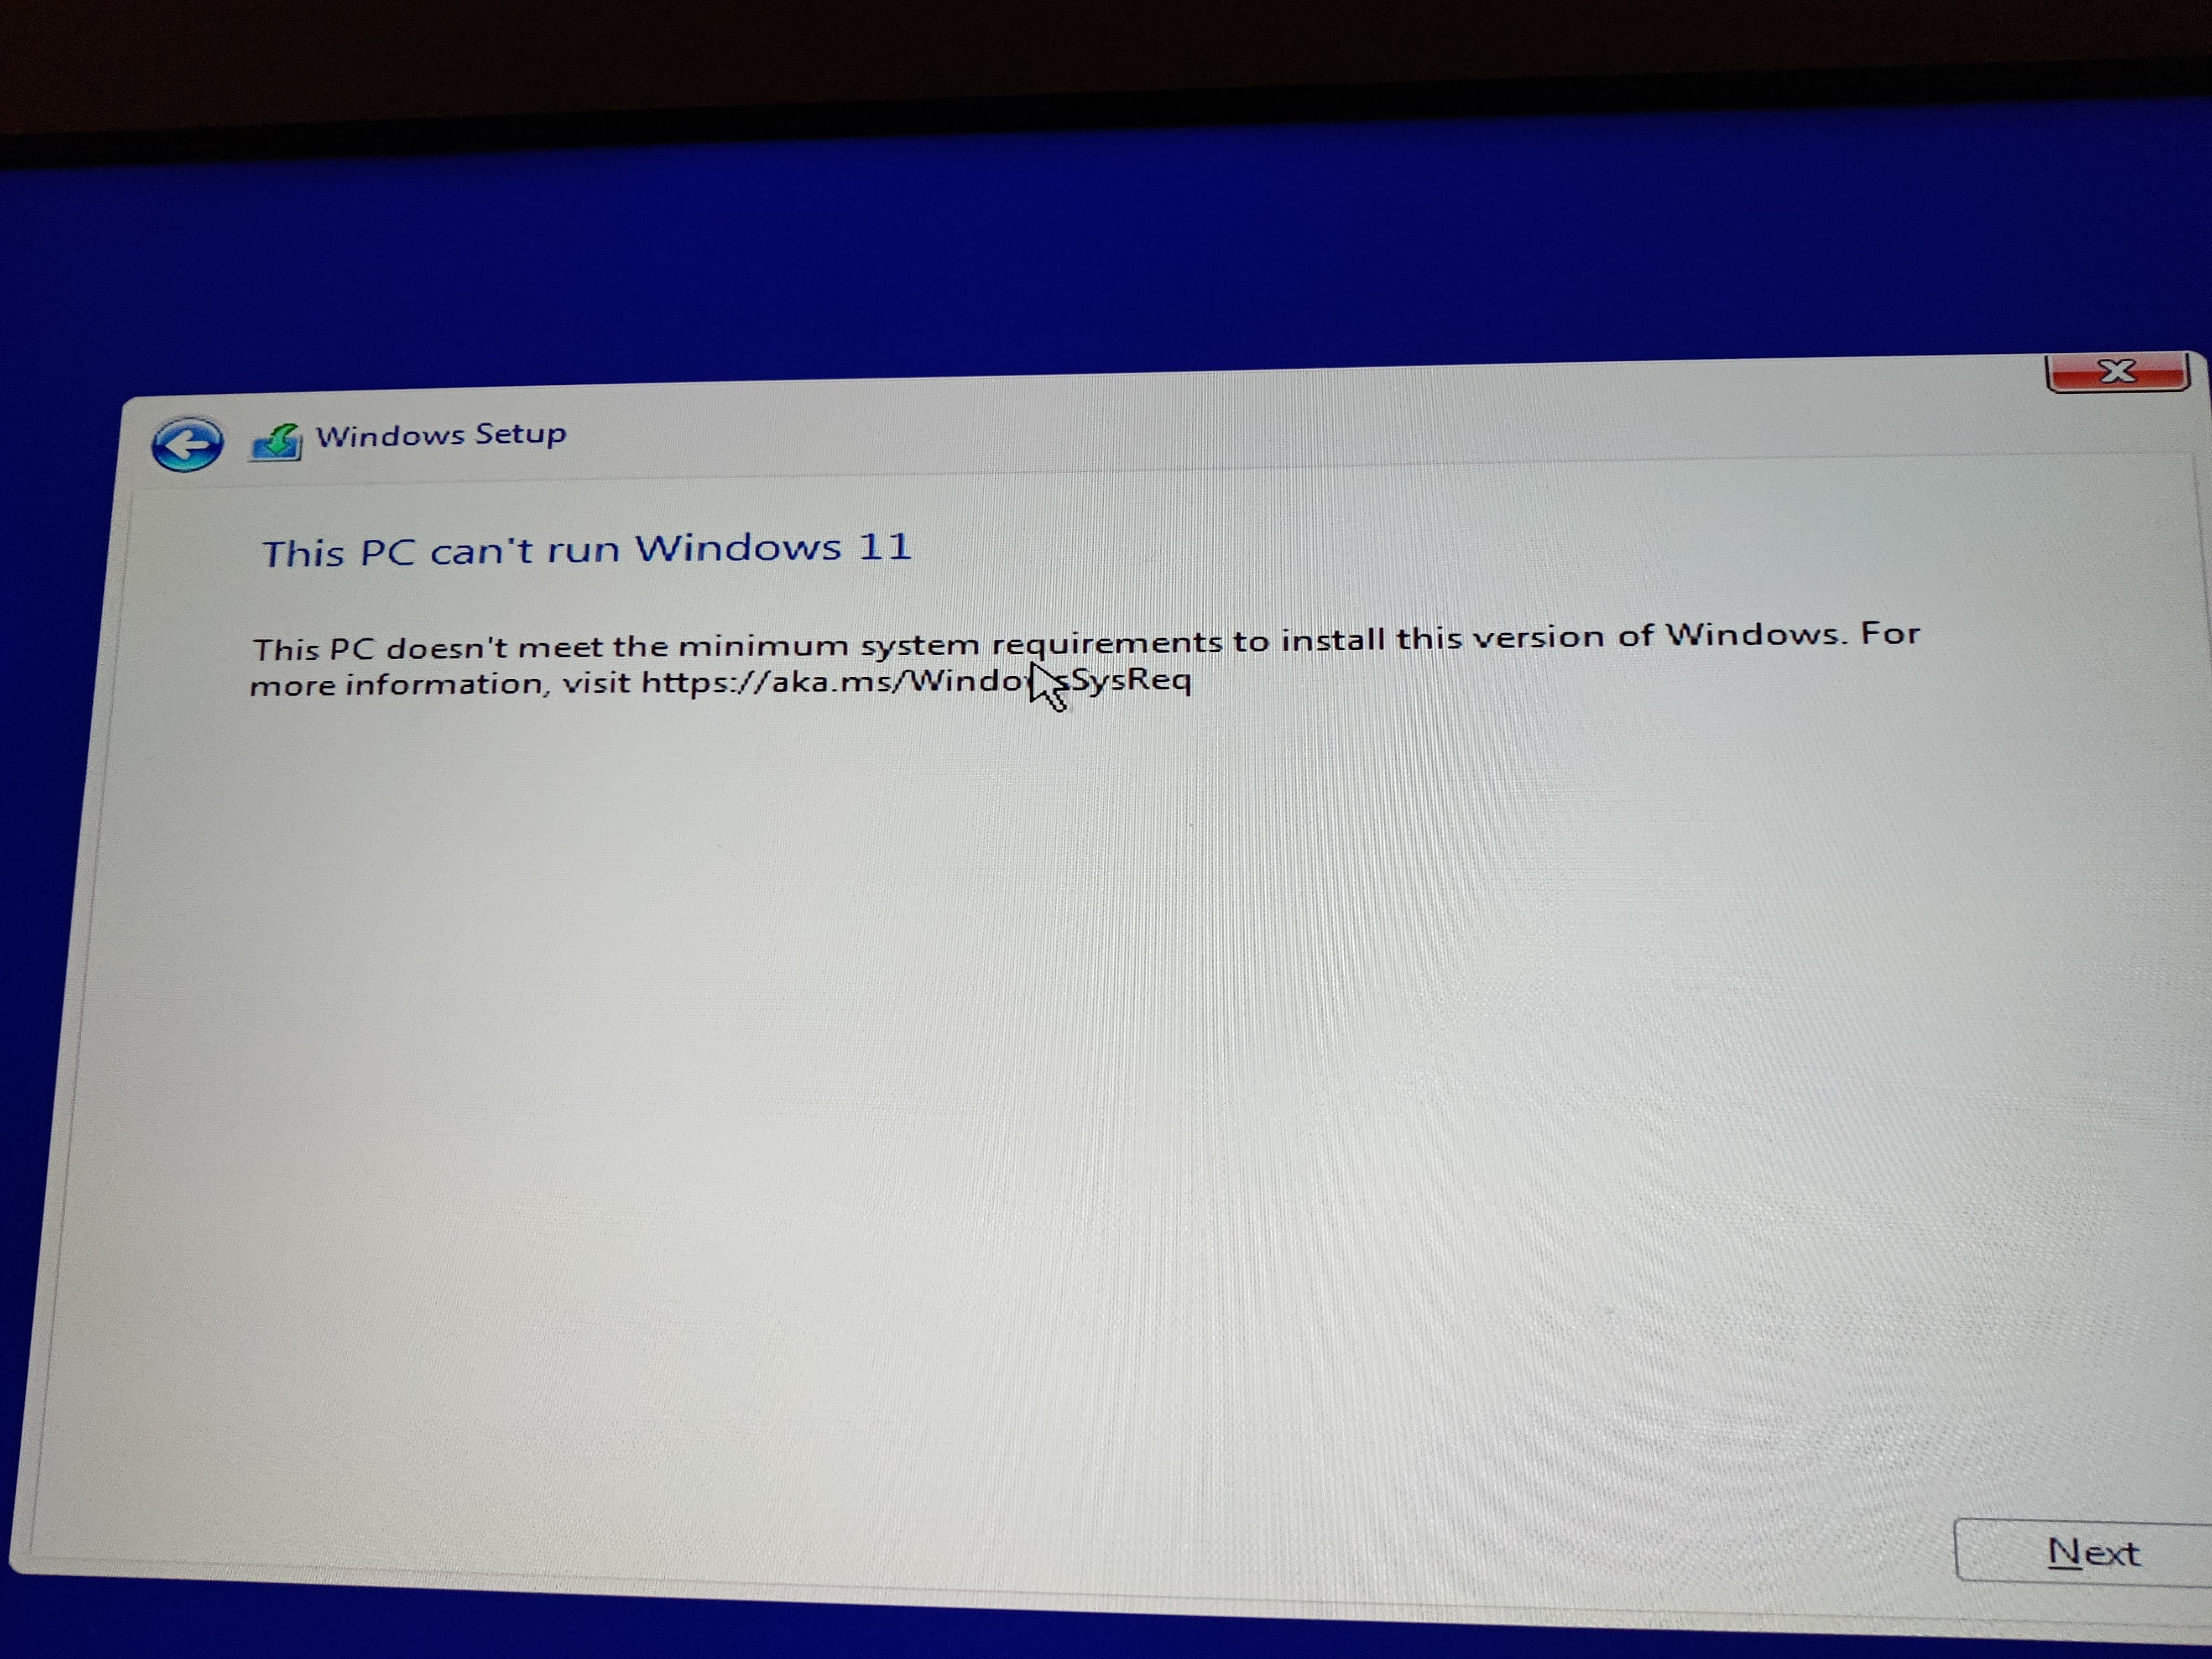
More like Win-dohs
After some research, I figured out I needed to enable secure boot in the BIOS which took some poking around in the "Advanced Mode" and rebooting. Apparently this is now a requirement in Windows 11. After that, I was able to proceed with the install which didn’t take too long. Now, I was clear to start doing some cable management.
Cable "management"
With a bag of zip ties, I started bundling up cables into what admittedly looks a bit like a rat’s nest. In my defense, those VGA cables are massive and the liquid cooling cables are no better! I did the best I could to keep them away from the fans and the PSU, but I realized if I wanted better cable management I would need to get much shorter VGA cables… maybe someday.
Good enough, I figured. It took a bit of effort, but I was somehow able to get the panels back on despite the cables trying their best to pop the side panel back off. I figured if that happened I’d address the situation with some shorter VGA cables, but I lucked out for now.

What it's really like
I lugged the PC over to where my current one is and swapped them out, satisfied with my work for the day. It was already almost 1 am on a weeknight, so I figured I’d pick up with the driver and software installation the following day.
Day 4: Drivers and software
This day my right-angle HDMI adapter came in so that I could actually run the PC upright for a change. I added some felt feet to the case to elevate it slightly as the connector still jutted out of the case a bit… and ended up blocking all the remaining ports for display port connections. Ugh.
After some digging around on Amazon, I figured I’d instead order a 270 degree extension HDMI and display port cable so I could thread them through the back of the case near the power cable. For now this adapter would work, but I needed one other port so I can connect my HTC Vive.
The driver installation was pretty uneventful thankfully and I was able to copy over some of my necessary programs from my old PC via the same thumb drive I used for the OS. I was even able to successfully boot Beat Saber after installing Steam and copying over my game files, mods, songs, and all! I was able to accomplish all this on my lunch break. After work, I planned to test out Beat Saber on the new build, expecting to see massive performance increase and no more lagging on my maps.
After dinner, I ran the StreamVR room setup and then tried actually playing Beat Saber… only to realize it was jittering like crazy. I was at a loss for what was happening. After much troubleshooting and fiddling around with settings in VR, I realized turning off motion smoothing made the jittering stop, but the latency was extremely high and the Expert+ maps were scarcely playable as a result. This didn’t stop Jon from trying out a Hard map and actually enjoying it more than on my old build. He commented that it was much smoother. Apparently the high latency wasn’t an issue at this difficulty level but it wouldn’t cut it for me as I exclusively play on Expert and Expert+.
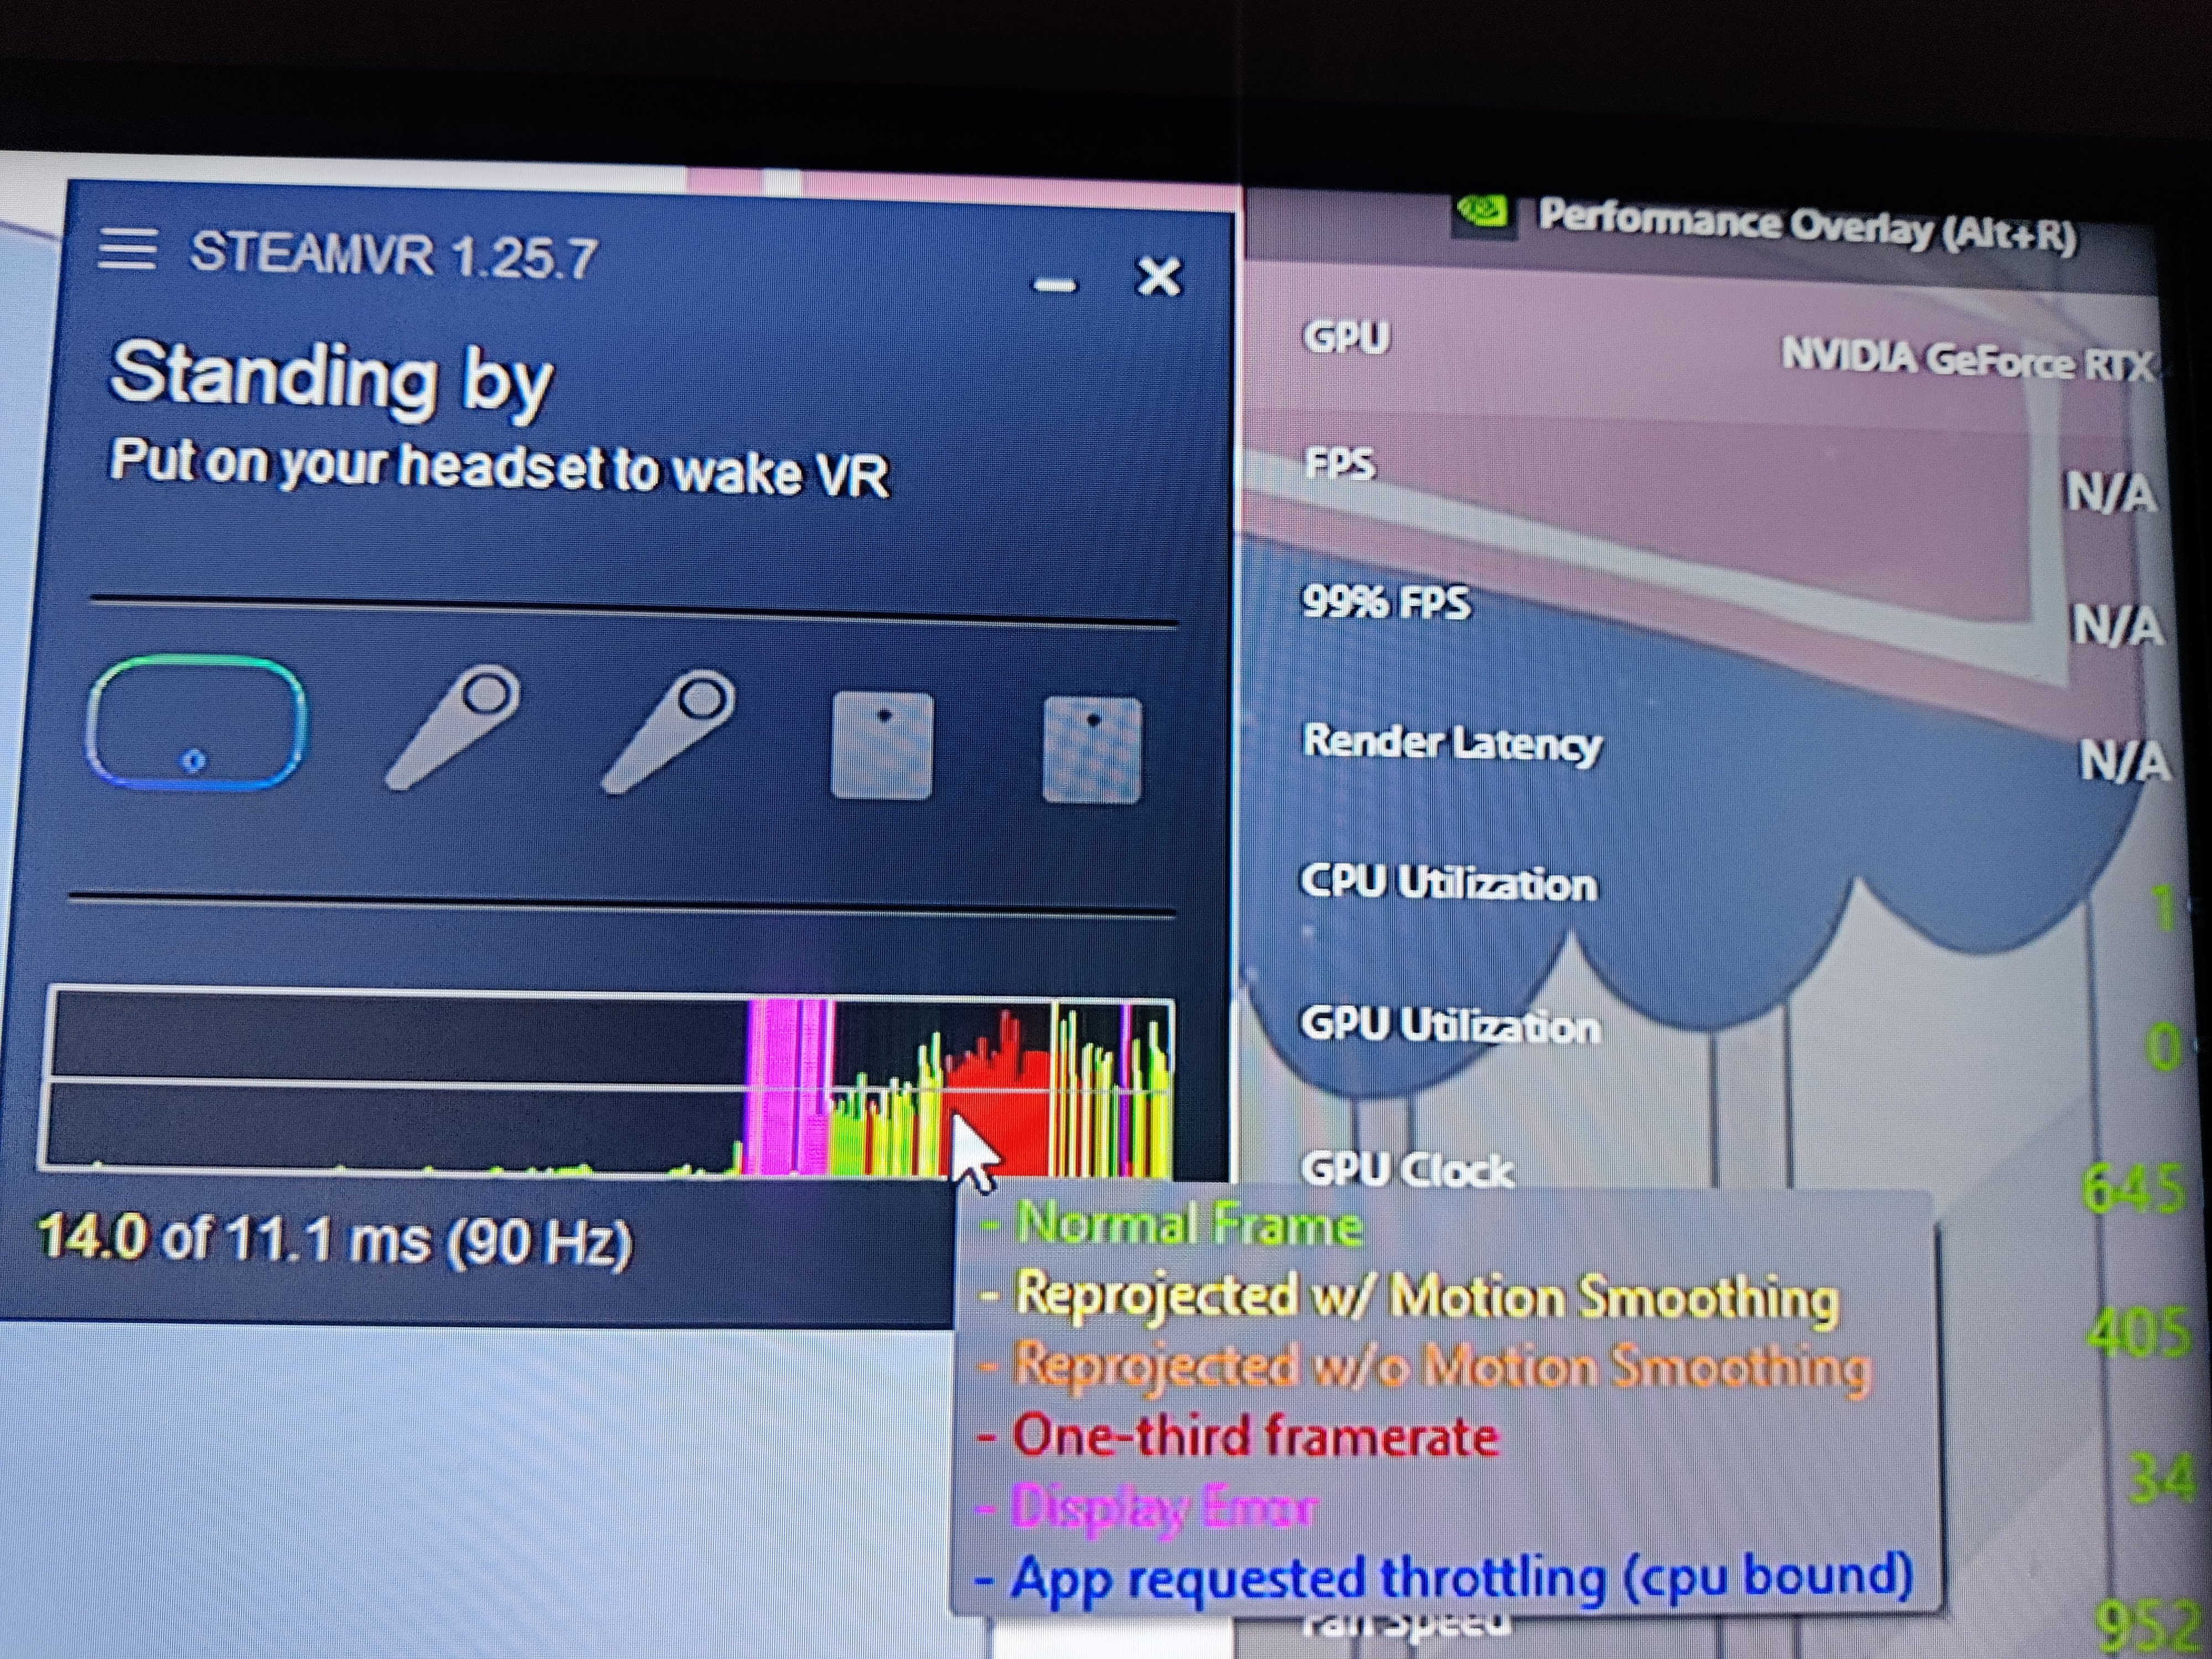
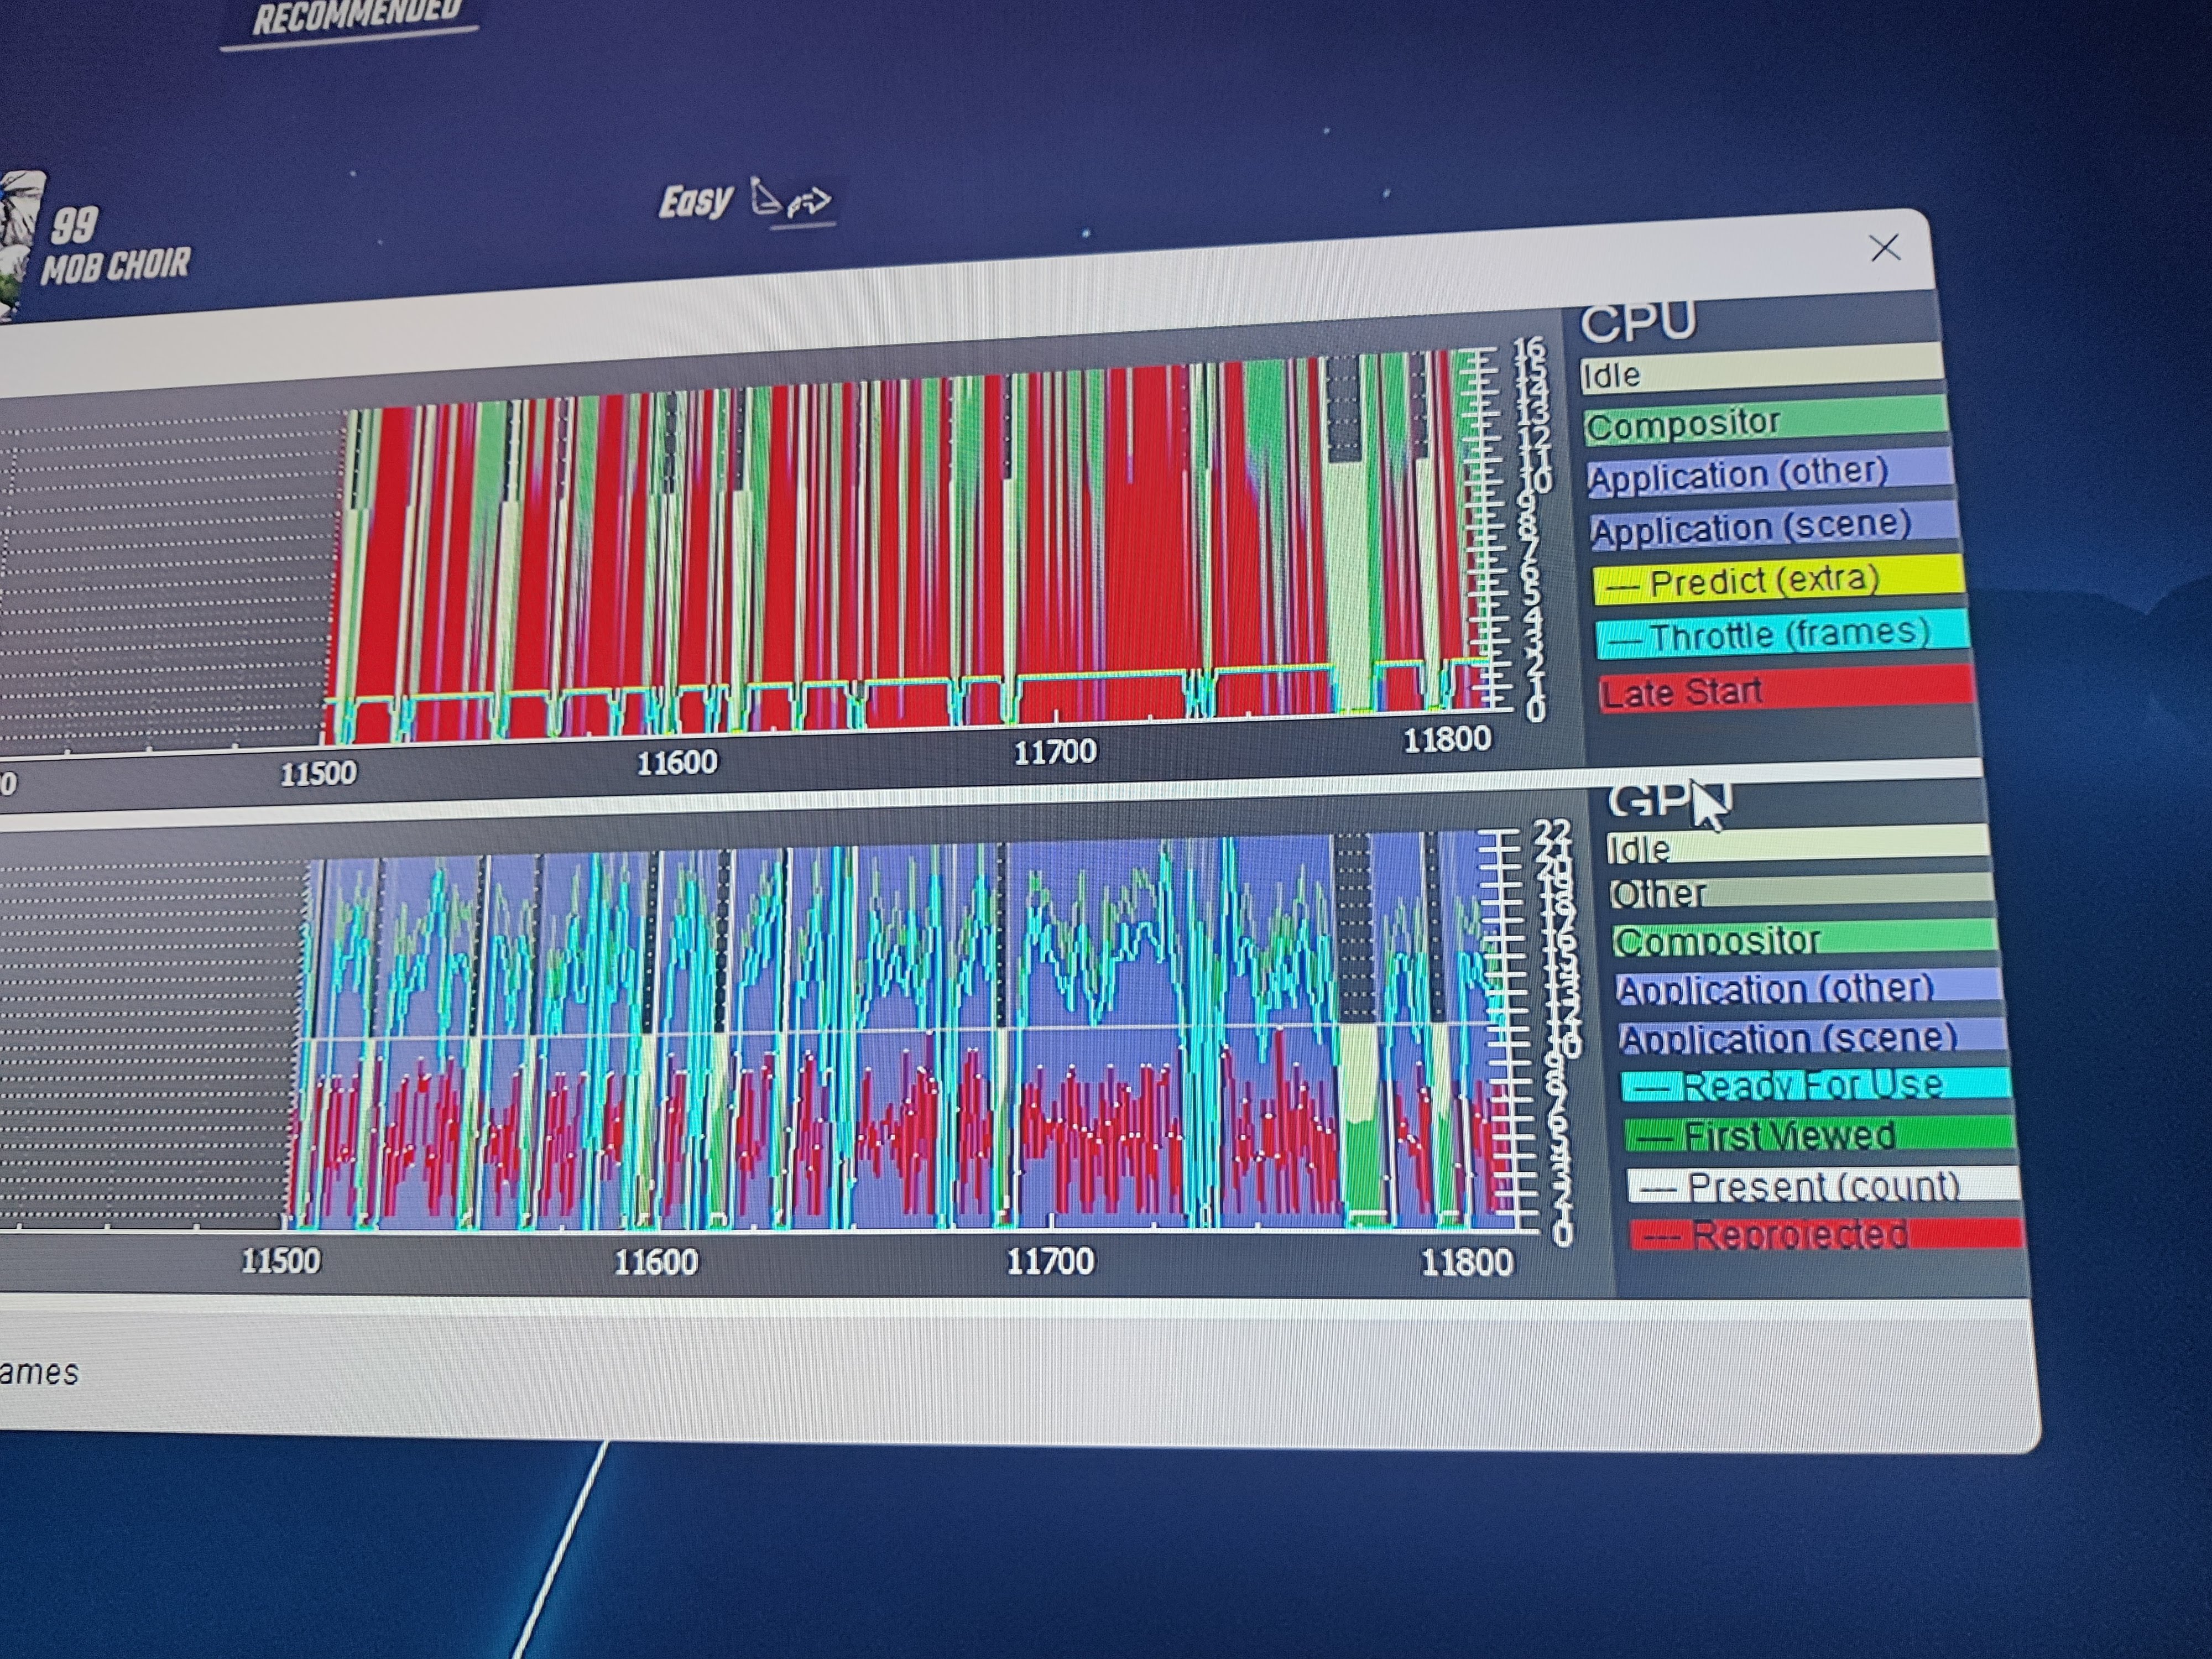
What is going on?!
I then tested dropping the resolution multiplier setting for Beat Saber way down to 20%… now everything was blurry in VR, but at least the latency was reduced -- not really a great workaround. While troubleshooting more, I found out there’s a SteamVR Performance Test that you can download and run so I did that to try to see if it would tell me anything. It told me my RTX 4090 wasn’t even VR-ready despite having the latest drivers… and that I should consider upgrading my graphics card! HA!
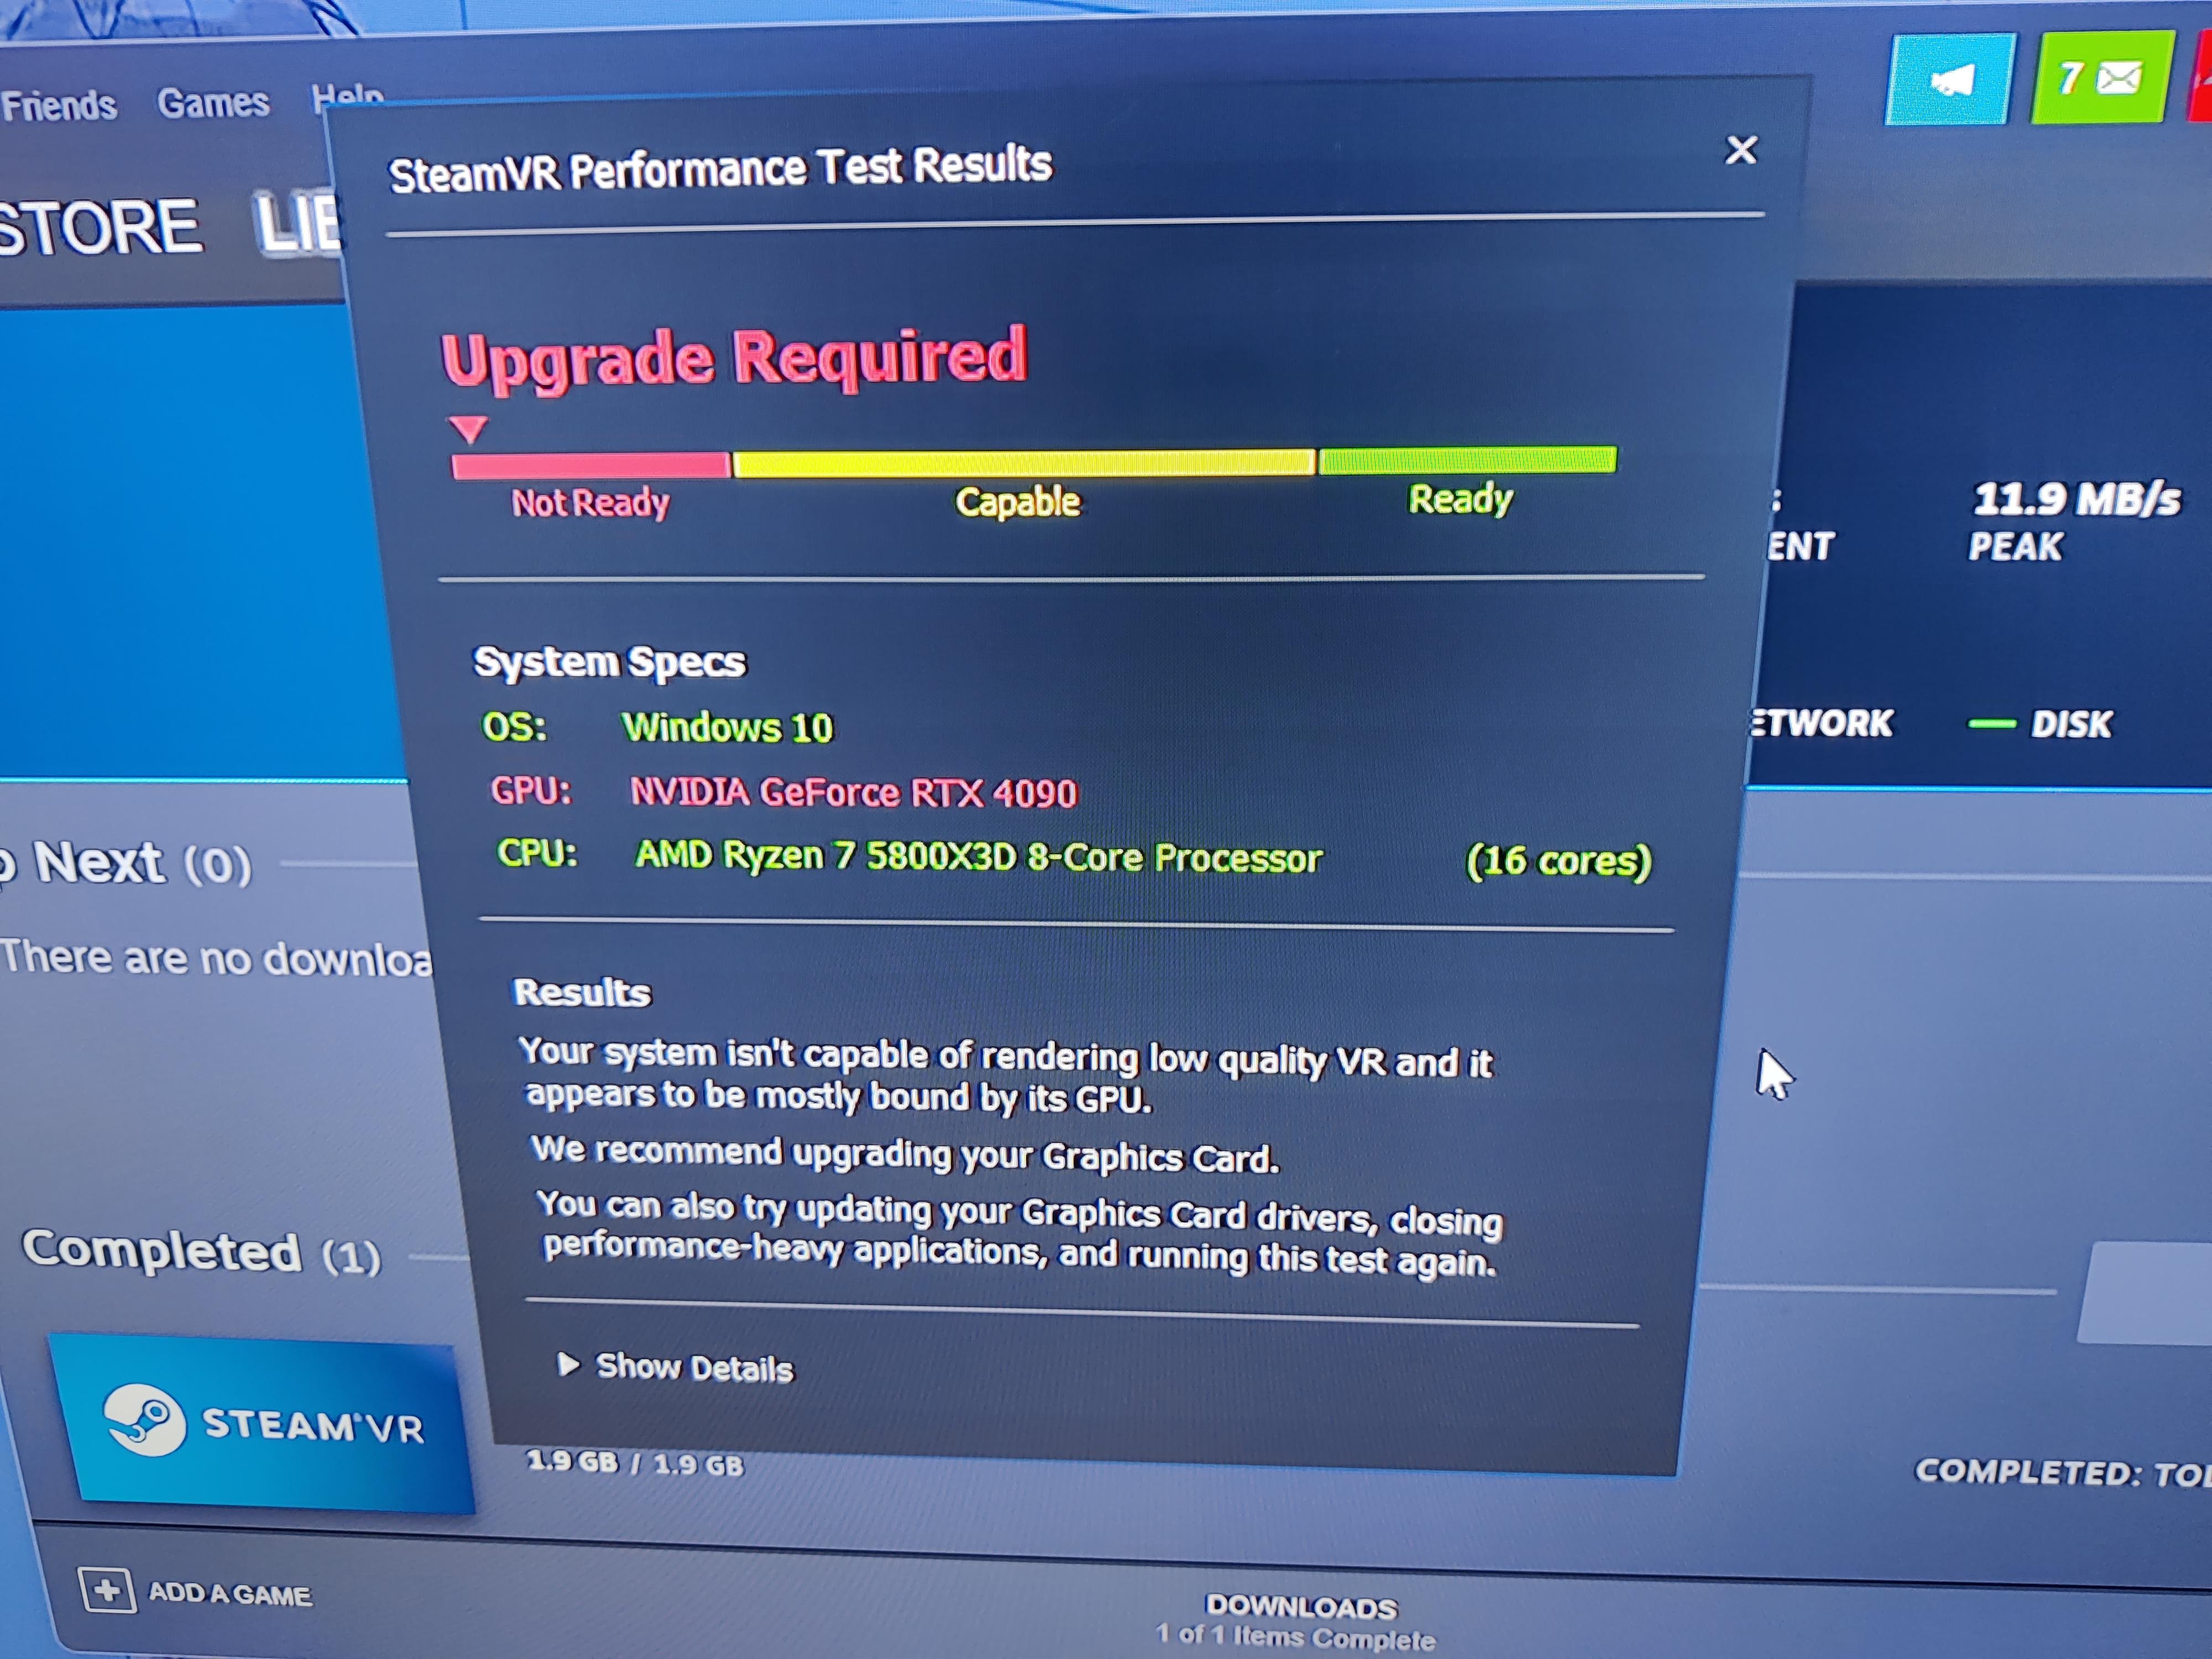
This had to be some kind of mistake. I reinstalled the GPU drivers and re-tested, getting the same baffling result. At that point, I dismissed the test, figuring it was useless. I then dug further in to try to see how the GPU was handling the load only to see on GeForce Experience that it was always measuring the load at 0% even while playing the light show of an intense wall map I had in Beat Saber. How was that possible? Was anything even running on this GPU? Did I actually break wire connections in the PCI-e cable extension? Was Windows 11 forcing everything to run on the CPU? All the while, SteamVR’s performance graph was showing lots of intermittent display errors in pink. Ugh.
After confirming a vanilla install of Beat Saber didn’t help, I poked around in Windows settings to make sure hardware-accelerated GPU scheduling was enabled, which it was. I then looked at the clock and saw it was yet again past 1 am. I wasn’t going to solve this tonight, not with work in the morning. Another day for another problem.
Day 5: Performance tuning
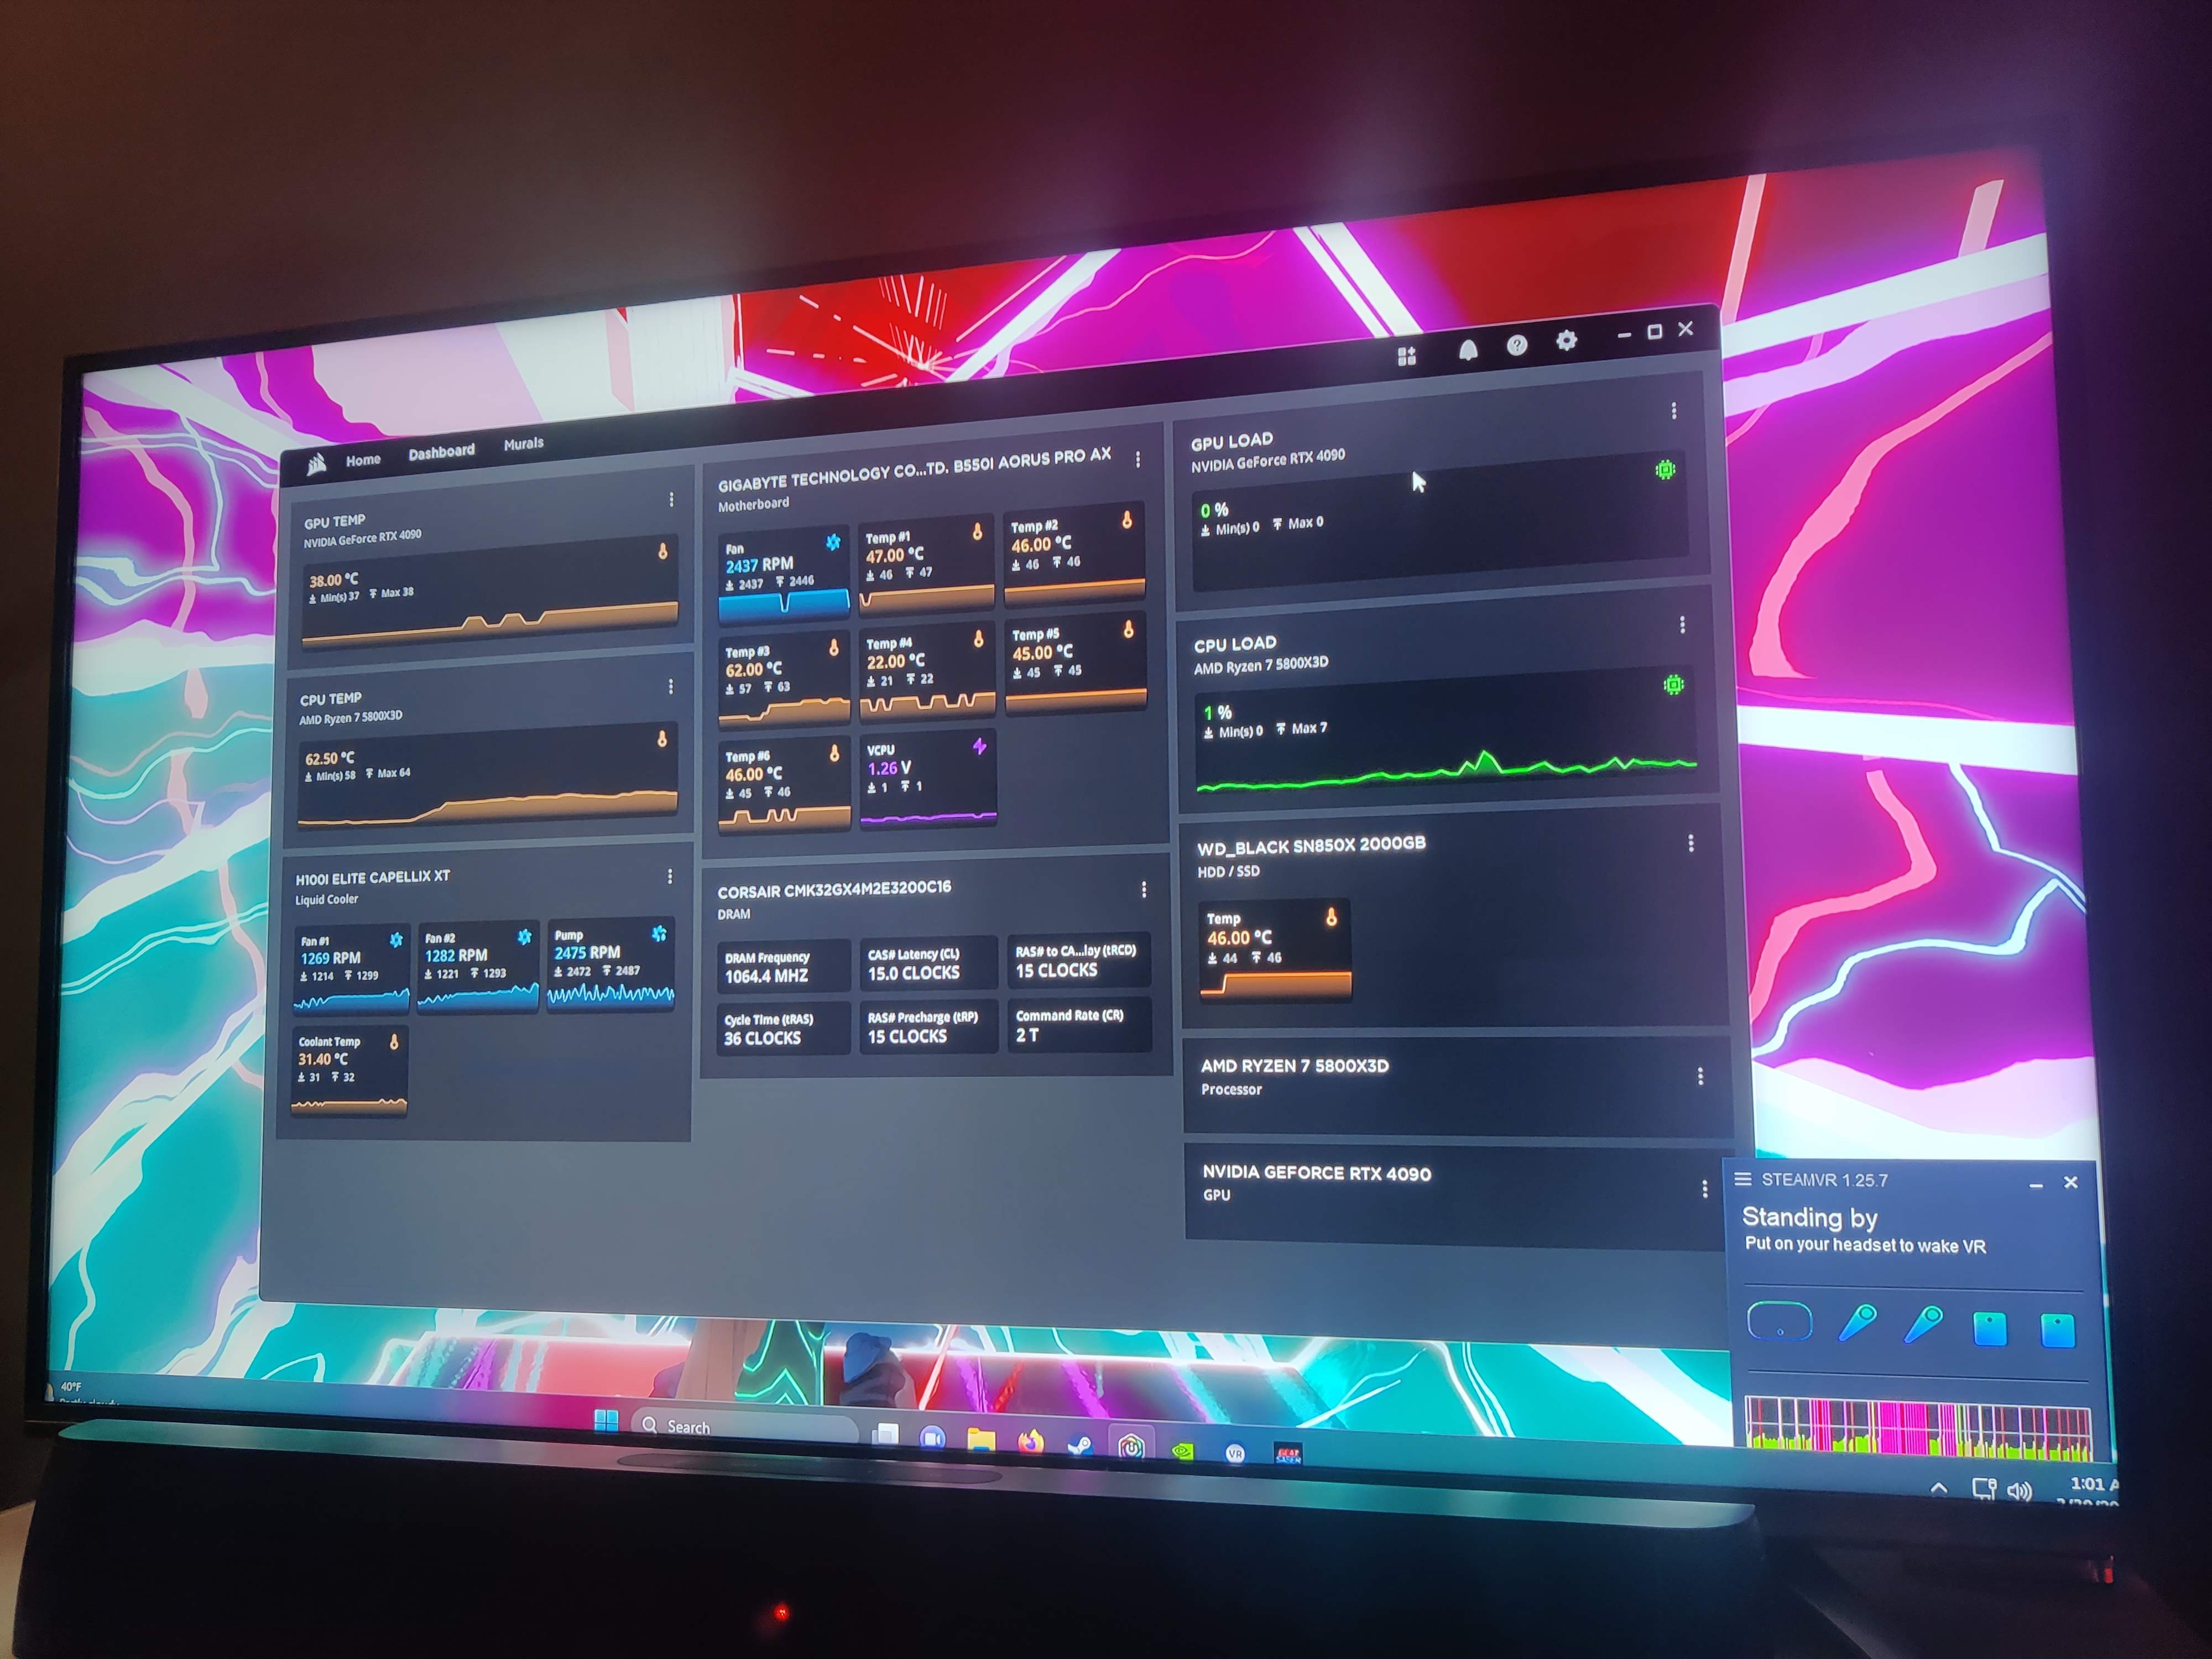
After a break day for game night with friends, I was back at it with troubleshooting the terrible performance I was getting for games and why it looked like the GPU load was at 0%. Checking the performance graph in Task Manager, I saw when booting a game, it actually would show the GPU 3D graph hovering close to 100%. So it was doing work, just struggling with whatever it was doing. Wasn’t this supposed to be way better than my old RTX 1080? Why was it doing worse?
Talking with James, we determined we should try turning off GeForce Experience game optimization, which we found out is incredibly aggressive and sets terrible “optimal” defaults. Once I relaunched Beat Saber without those “optimal” settings, everything improved noticeably. MSAA (Multi-Sample Anti-Aliasing, a multiplier on the resolution) was set to 8x by GeForce Experience, which was absurdly high -- even 4x is supposedly too much. I opted to turn it off entirely for Beat Saber via the in-game settings and made sure to tell GeForce Experience to not overwrite it by disabling its scanning for games. I then set everything else to the maximum and applied the new settings, crossing my fingers. Miraculously, everything was now working smoothly! The GPU 3D graph in Task Manager also showed only 32% now — success! Huge shout-out and thanks to James for all the assistance between the build and the several days of troubleshooting.
With my system now working fully, I hopped into VR and ran through a few maps, testing out the GeForce Experience recording functionality. I had to reinstall all of my mods, but was able to get most things back to how they were for my old setup, though I did lose all of my data for my download dates (and thus my ordering) on songs, metadata about my favorites, playlists, upvotes, and old scores. I still at least had all my custom saber models, avatar, and my custom songs themselves, so all was not lost -- it was just hard to find songs now.
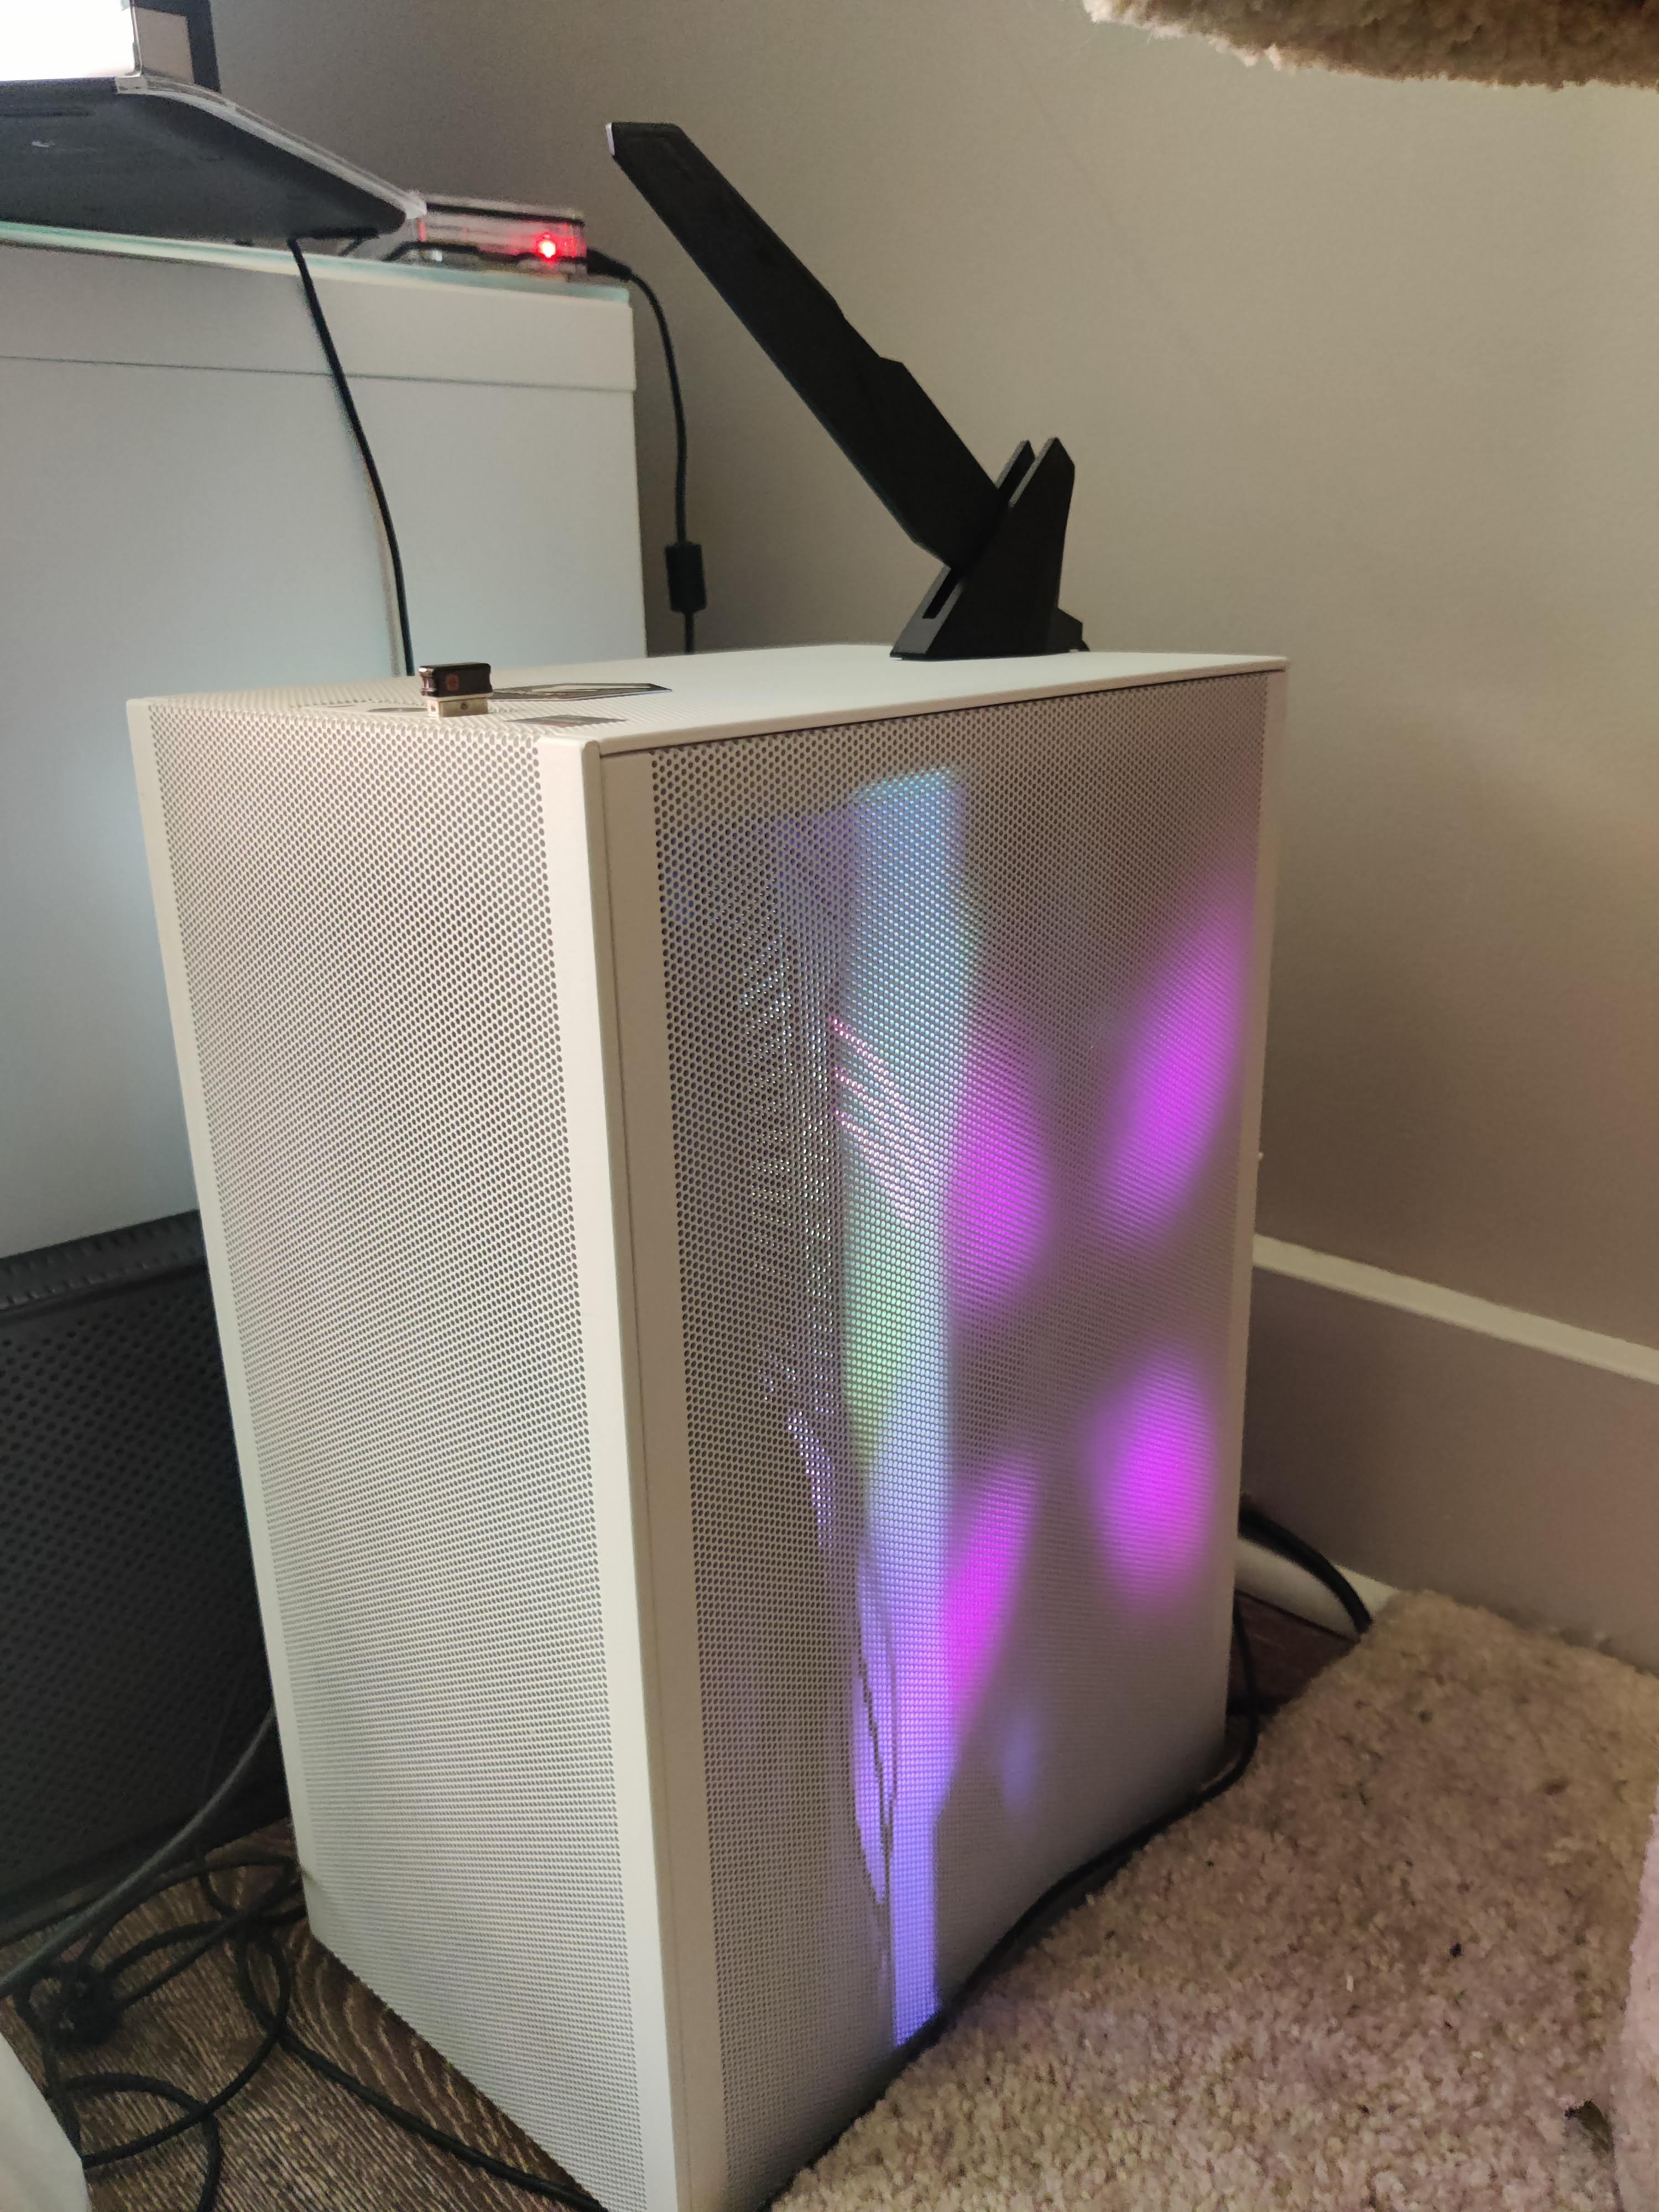
Finished build (I took the antenna off right after and am running this wired, but it's funny to see how large it is compared to the case).
Day 6: Enjoying the build
Now that it was once again the weekend, I was able to take full advantage of the PC and play some Expert+ maps. Everything was visually sharp and notes flew at me much more smoothly now. I even noticed that the game was much less forgiving now on timing… it was as if before the game was giving me the benefit of the doubt on some cuts, especially the overhead ones as the system struggled to keep up with my gameplay. I was starting to fail some songs that weren’t much of an issue before. Okay, no big deal, it’s like getting a new powerful car and learning how it handles versus your clunky old ride. It’s a silly comparison, but that’s really what it feels like playing the same game on this crazy new build. As I get more accustomed to it, I look forward to the coming years of gameplay.
Takeaways
I learned a lot during this experience, which helped me justify spending all this time and energy on the build. I could have paid for a pre-built PC but that would have been much more expensive, but I wouldn’t have had this fun story to share. Some of the things I learned:
- How to install liquid cooling (my old build was fan-only)
- FAT32 file size limitations
- what MSAA even is
- GeForce Experience really isn’t great at all for auto-optimizing games
Wrap-up
Whew, that was a long post! If you made it to the end without skipping, congrats! If not, no worries unless you’re thinking of attempting a similar build, in which case, I’d implore you to go back and read my struggles so you know what you’re getting into.
While I was able to get this working, it took way more time than I expected. I didn’t have to make any major modifications to the case like drilling holes which was great, but I realized I am very likely going to need a 3D-printed bracket to support the massive graphics card, which isn’t very firmly held in place due to the millimeter discrepancies between the different RTX 4090 cards. Due to small misalignment between the holes for the metal supports in the case and where the card’s bottom falls once seated into the PCI riser, I needed to wedge some folded-up paper in (crappy, I know, but a reasonable stopgap in the meantime). I talked with my architect friend who designs and prints parts all the time and we are figuring out an optimal support piece once the display extension cables come in so that the custom part will be compatible with the final wire configuration. Once that’s done, my build will be 100% complete, but until then, it’s still usable… as long as it’s upside down.
Overall, I’m pretty happy with this build for how little money I spent. It was quite the project!