
6 min read
Chances are you use or at least have heard of Ad-Block or some variant of browser-based ad-blocking. But what if you could take it a step further, blocking not just ads in any browser (apps included), but also telemetry and malicious sites across every device on your home network? Today we explore setting up network-level ad-blocking with a Raspberry Pi. It's a lot easier than it sounds.
I've been meaning to write about the Pi-Hole for a while. I heard good things about it from a friend over a year ago and decided to try out setting up one for myself shortly after. I moved to Cambridge around that time and swung by The Microcenter to buy myself a fancy new Raspberry Pi 3B and a good case. Before that, I only had the original crappy Raspberry Pi from college – back when you had only 2 USB ports to work with instead of 4 and no fancy Bluetooth or WiFi cards built in. To have either, you'd need a dongle, and you can imagine how annoying that got if you also needed to plug in a USB keyboard.
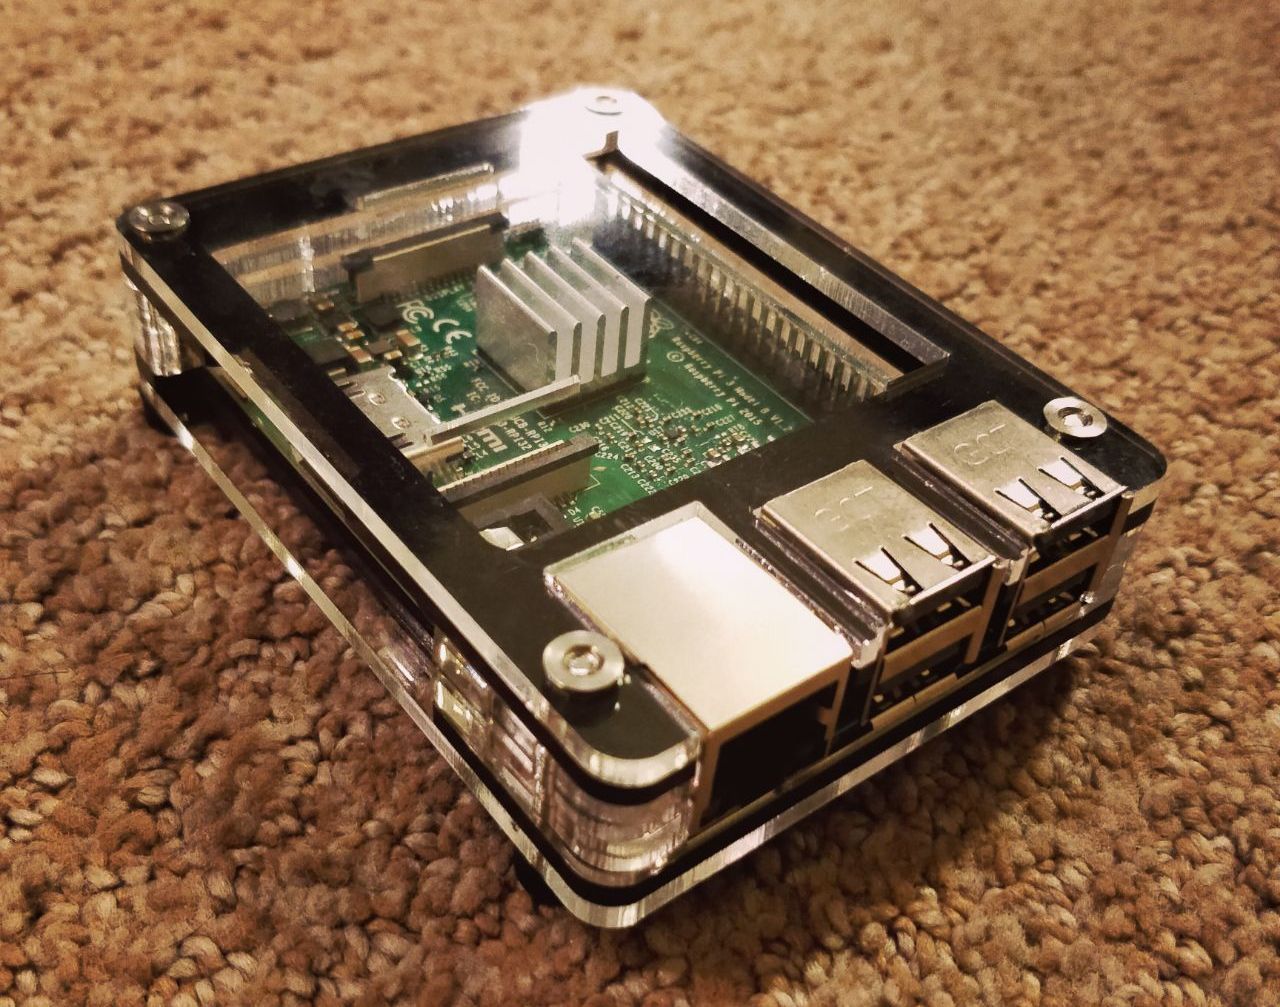
This is the case I ended up getting. Not only does it look cool, it also has heat sinks!
Sounds Neat, But How Does it Work?
Before diving into the setup (which is actually pretty straightforward), it helps to explain what DNS and black holing are as well as the basics of how a nameserver works.
DNS and Nameservers
Rather than having to remember every website's IP, humans use easy to remember names called domain names to visit sites. DNS or Domain Name System is like one of those old school phonebooks but for the internet, providing the IP or "phone number" for each site or "person". A browser will use the IP returned through DNS to access the site. DNS nameservers are sources your computer can query for the IP of a domain. You can read a much more in depth guide here
Black holing
From Wikipedia:
In networking, black holes refer to places in the network where incoming or outgoing traffic is silently discarded (or "dropped"), without informing the source that the data did not reach its intended recipient.

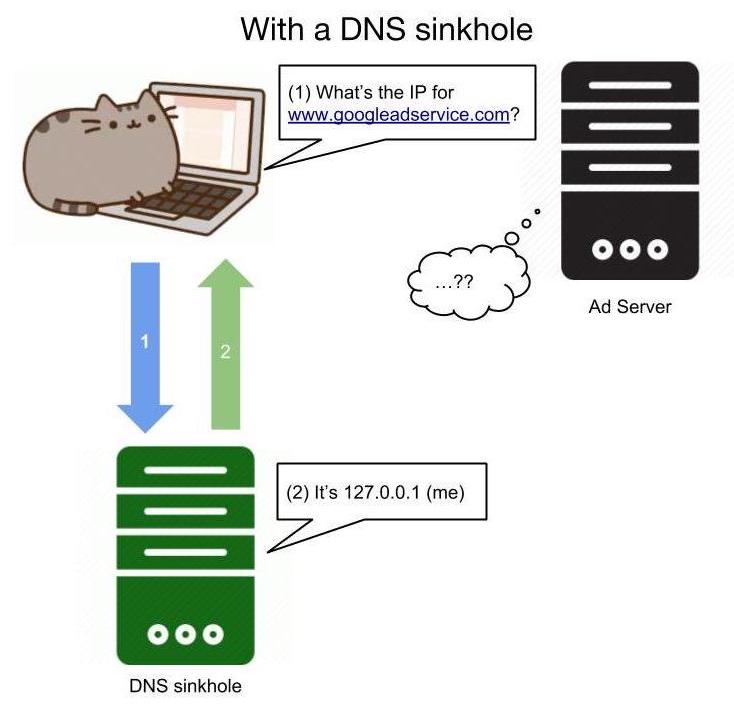
Consequently, a black hole DNS (also referred to as a DNS sinkhole) is where certain entries in the "phonebook" refer to a "wrong number".
In the case of the Pi-Hole, it functions as a DNS sinkhole, meaning that requests for certain blacklisted domains (or any domain not in a whitelist if you're really agressive about blocking) will come back with a false result. This false result is the IP of the Pi-Hole itself to tell you that it blocked the domain name you requested, assuming you are using the Pi-Hole as your device's DNS server. While DNS sinkholes can be used maliciously to return harmful IPs for otherwise good domains, in this case it protects us from those unwanted websites.
Setting it Up
As shown right at the top of the official Pi-Hole site, it's as simple as
curl -sSL https://install.pi-hole.net | bashThis will run the automated installer. If you're skeptical of piping scripts into bash, you can simply run the same command excluding the | bash part and peruse through the script to see what it does.
After the installation succeeds, you'll want to navigate to $your_raspi_ip/admin in your browser to start setting up your blocklists to generate Pi-hole's gravity. These are simple txt files using the following format:
127.0.0.1       malicious-site.com
127.0.0.1       ads-galore.net
127.0.0.1       secretly-ransomware.org
# etc...
Each domain in this list once added and applied to the Pi-Hole will be trapped in the event horizon.
My recommended site to refer to for popular blocklists is https://wally3k.github.io/. This is the "Big Blocklist Collection" containing blocklists for suspicious sites, known malware sites, advertising sites, etc. You can pick and choose which blocklists to use and can easily click on and examine the contents of each blocklist.
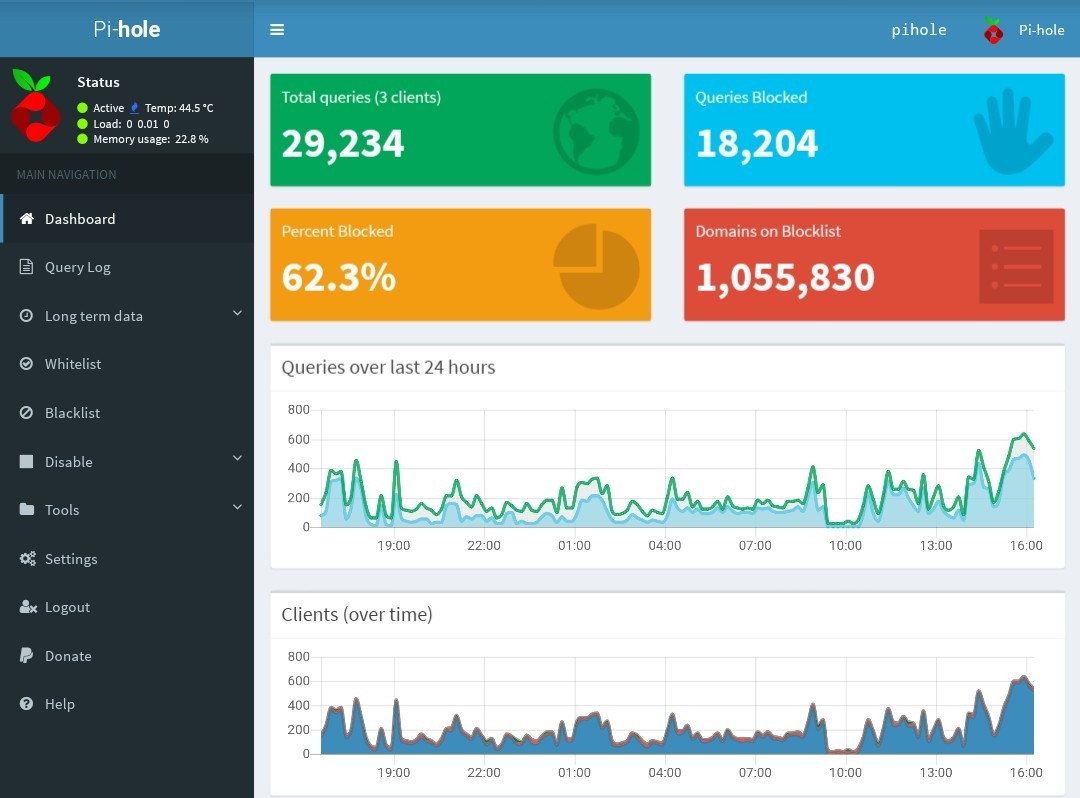
Once you decide you want to use a certain blocklist, navigate to Settings > Blocklists and add the URL of the blocklist. Don't forget to hit "Save and Update" when you're done. As you can see in the image of the Pi-Hole admin UI, more than half of the traffic on my home network is blocked. The major offender here is www.googleadservices.com which is understandable as their ads are virtually everywhere. You don't really notice how prevalent ads are until you're used to using the Pi-Hole and suddenly switch off to your default DNS settings.
Help, the Gravity is Too Strong!
If you're over-zealous like I was at adding blocklists, chances are necessary parts of otherwise good sites become broken or a site you otherwise trust becomes blocked altogether. This is where whitelists come in. Although it's possible to add whitelists via the admin page similar to how blocklists are added, I recommend using this command on the Pi-Hole:
pihole -w blocked-domain.com piholed-domain.netLikewise, it's possible to use the CLI to blacklist individual sites as well:
pihole -b blocked-domain.com piholed-domain.netPutting it to Work
The final step is to actually tell your devices to use the Pi-Hole as their main DNS nameserver. You can either set the entire network to use the Pi-Hole as the main DNS in your router configuration (my recommendation), or you can set it on a per-device basis. I won't cover the steps to set the DNS for a router since there are so many different router configuration UIs, but you should be able to navigate to some kind if Networking page where you can set a custom DNS nameserver.
Mac
Go to System Preferences > Network > Advanced. Click the DNS tab and remove any exisiting DNS entries with the "-" button and add the IP of the Pi-Hole with the "+" button. Click OK and then hit apply for the change to take effect.
Linux (Ubuntu)
Either edit /etc/resolv.conf or /etc/resolvconf/resolv.conf.d/base to have just this:
nameserver $your_pihole_ipAndroid
Go to Settings > Wi-Fi and long press on the network you're connected to. Tap "Modify Network". Some devices might require you to check the Advanced box to see more options. From there set your IP setting to Static and simply provide the Pi-Hole IP for the DNS.
Windows
Although I do use windows for my gaming computer, I haven't bothered to change the DNS for it. You'll have to look this one up.
Conclusion
The Pi-Hole is by far, my favorite Raspberry-Pi project to date, not because it was challenging, but because it's the most useful. I rely on the Pi-Hole as my DNS both at home and on the go thanks to Wireguard (see my post about that here). This is a fantastic beginner project and one that will continue to serve you for the life of the Raspberry Pi.